2017/04/06
| unity打磚塊_教學素材_from_陳間時光.zip |
(1)建立一個新的 2D Unity 專案
先用一個 UI.Text 顯示你的學號姓名, 顏色要清楚, 字體不要太小(至少 24點)
(2)設定遊戲畫面與手機直拿相同比例 9:16
點主攝影機兩下, 距離設(0, 8, -10), 投影場景大小設 15
捲動滾輪以便看到整個場景
點主攝影機兩下, 距離設(0, 8, -10), 投影場景大小設 15
捲動滾輪以便看到整個場景
(3)建立打磚塊場景的牆壁, 要有 碰撞器 Collider 2D
左右的牆壁可以先做一邊, 加入碰撞器好了再敲 CTRL_D 複製後移動
(4)拉入球拍, 給它 Collider 碰撞器 和 剛體 Rigidbody2D
碰撞器建議選 Capsule Collider 2D 膠囊碰撞器, 方向設定橫向 (Horizontal);
(如果 Unity 5.4 或以前只能選 Box Collider 2D)
(如果 Unity 5.4 或以前只能選 Box Collider 2D)
注意剛體內的地心引力設 0, 還有限制 Z 軸別讓它旋轉
(5)讓球拍可以被人用鍵盤左右箭頭鍵移動
//建立腳本 Player.cs 掛給球拍
//名稱就用 Player 因為其他腳本要用到 !!
///// 把以下複製到 類別 class Player 裡面, 不可放類別外面喔 !
// 分數 score, 故意用 static 以便可以寫 Player.score
[Header("紀錄分數, 用 static, 方便寫 Playr.score")]
public static int score = 0;
public static int highScore = 0; //最高分數
//宣告 for 球拍, 注意球拍要有 碰撞器 Collider 和 剛體 Rigidbody2D
[Header("球拍移動速度, 25 是今年育達多遊系獨立招生名額:-)")]
public float speedX = 25; // 故意 public 可從檢視窗修改
public Rigidbody2D myBody; // 如果腳本不是掛球拍就要拉到這
[Header("紀錄分數, 用 static, 方便寫 Playr.score")]
public static int score = 0;
public static int highScore = 0; //最高分數
//宣告 for 球拍, 注意球拍要有 碰撞器 Collider 和 剛體 Rigidbody2D
[Header("球拍移動速度, 25 是今年育達多遊系獨立招生名額:-)")]
public float speedX = 25; // 故意 public 可從檢視窗修改
public Rigidbody2D myBody; // 如果腳本不是掛球拍就要拉到這
// in Start( ) { 取得 Rigidbody2D 剛體 連結到 myBody 如果沒事先拉過來
if( ! myBody ) myBody = GetComponent<Rigidbody2D>( );
highScore = PlayerPrefs.GetInt("PlayerHighScore"); // 讀取紀錄
if( ! myBody ) myBody = GetComponent<Rigidbody2D>( );
highScore = PlayerPrefs.GetInt("PlayerHighScore"); // 讀取紀錄
// in Update( ) 讀取左右箭頭按鍵的值控制球拍左右移動
myBody.velocity = Input.GetAxis( "Horizontal" ) * new Vector2(speedX ,0);
if (score > highScore) {
highScore = score;
PlayerPrefs.SetInt("PlayerHighScore", score); // 更新紀錄
} // if( score >
myBody.velocity = Input.GetAxis( "Horizontal" ) * new Vector2(speedX ,0);
if (score > highScore) {
highScore = score;
PlayerPrefs.SetInt("PlayerHighScore", score); // 更新紀錄
} // if( score >
/// (6)建立一個 2D 球形 Sprite Circle 當作乒乓球
// Create >> Sprites >> Circle
// 拉入場景中調整位置
/// 要給它 碰撞器 CircleCollider2D, 也要給 剛體 Rigidbody2D,
// Create >> Sprites >> Circle
// 拉入場景中調整位置
/// 要給它 碰撞器 CircleCollider2D, 也要給 剛體 Rigidbody2D,
Component >> Physics 2D >> Circle Collider 2D
Component >> Physics 2D >> Rigidbody 2D (第一項)
Component >> Physics 2D >> Rigidbody 2D (第一項)
// 還有, 剛體 內 不要有地心引力(就是設 0)
///(7)讓球會自己動 (受物理引擎作用)
/// 建立腳本 Ball.cs 掛給球
/// Ball.cs -- 拉給球 以便控制球
/////// 以下要寫到類別 class Ball 裡面
//宣告 for 球
[Header("球初始速度")]
public float speedX = 11; // 故意露出可在檢視窗修改
public float speedY = 8;
[Header("球的剛體, 如果腳本不是掛在球身上, 要事先拉過來")]
public Rigidbody2D ball; // 偷懶取名 ball, 應該叫做 ballRigidbody2D 比較好
private bool isPlaying = false;
[Header("是否要讓球等速度移動, 打勾表示要定速度")]
public bool equalSpeed = false;
///new function
void ballStart( ) {
isPlaying = true;
if( ! ball ) ball = GetComponent<Rigidbody2D>( ); // 防呆一下 :-)
ball.velocity = new Vector2(speedX , speedY);
}
void resetSpeed( ) {
float x = ball.velocity.x;
float y = ball.velocity.y;
if(x!=0) if(x>0) x = speedX; else x = -speedX;
if(x!=0) if(y==0) y = speedY / 2; // 偷吃步
if(y!=0) if(y>0) y = speedY; else y = -speedY;
ball.velocity = new Vector2(x , y);
}
///
/****** 目前以下是註解喔!! ******
void cky( ) {
float x = ball.velocity.x;
float y = ball.velocity.y;
if (x != 0) if (y == 0) y = speedY / 2;
ball.velocity = new Vector2(x , y);
}
/**********************/
/////////////
//////////vvvvvvvvvvvvvvvvvvvvvv
// in Start( ) { 寫以下兩列
if( !ball ) ball = GetComponent<Rigidbody2D>( );
Invoke("ballStart", 3); // wait for 3 seconds
// in Start( ) { 寫以下兩列
if( !ball ) ball = GetComponent<Rigidbody2D>( );
Invoke("ballStart", 3); // wait for 3 seconds
// in Update( ) { 寫以下三列 } vvvvvvvvvvvvvvvvvvvvvvvv
if( !isPlaying) if(Input.GetKey(KeyCode.Space)) ballStart( );
// cky( ); // 偷偷調整 y 如果 球只在左右移動
if(equalSpeed) resetSpeed( );
if( !isPlaying) if(Input.GetKey(KeyCode.Space)) ballStart( );
// cky( ); // 偷偷調整 y 如果 球只在左右移動
if(equalSpeed) resetSpeed( );
///// Play 起來看看 !? 靠餐喔球會貼住牆壁黏住不會跳 ???
/// (8)球需要改用會彈跳的物理材質 -- 建立 Phisics Material 2D
// 請建立一個 物理 2D 材質, 設定 (Friction 0, Bounciness 1), 名稱隨便(建議 bouncy)
// 把這 物理 2D 材質 設定給球的 剛體內的材質 (5.4版本之前放碰撞器材質)
// 請建立一個 物理 2D 材質, 設定 (Friction 0, Bounciness 1), 名稱隨便(建議 bouncy)
// 把這 物理 2D 材質 設定給球的 剛體內的材質 (5.4版本之前放碰撞器材質)
Friction 0 表示沒有摩擦力, Bounciness 1 表示彈性最佳
** 請不要把 貼圖材質球 (Material) 和 物理材質 (Physics Material) 搞混喔 !!
** 一個是視覺的, 另一個是物理運動相關!
///(9)把磚塊拉入場景中並掛給 2D碰撞器 (Collider2D)
Component >> Physics 2D >> Box Collider 2D
Component >> Physics 2D >> Box Collider 2D
/// (10)讓磚塊知道被球打到, 當然要用程式碼(腳本)
/// 可以用很簡單的JavaScript腳本讓磚塊在被撞到自我消失
/// BrickSimple.js --- 簡單版本 by [email protected]
/// 掛給磚塊
#pragma strict
function OnCollisionEnter2D( him: Collision2D) {
gameObject.SetActive(false); // 消失 ; 也可以 Destroy(gameObject);
/// 如果要檢查 是否撞到球才做事, 那要給球衣個 Tag, 例如 BALL
/// if(him.gameObject.tag =="BALL") { gameObject.SetActive(false); }
}
/// 掛給磚塊
#pragma strict
function OnCollisionEnter2D( him: Collision2D) {
gameObject.SetActive(false); // 消失 ; 也可以 Destroy(gameObject);
/// 如果要檢查 是否撞到球才做事, 那要給球衣個 Tag, 例如 BALL
/// if(him.gameObject.tag =="BALL") { gameObject.SetActive(false); }
}
//(11) 但是這樣沒有計算分數, 所以, 來個正式版...
///建立一個 JavaScript 腳本 Brick.js 給磚塊用來偵測被打到要消失並計算分數
/// Brick.js --- by [email protected]
/// 掛給專塊
#pragma strict
//import System.Collections.Generic;
private var myRenderer : SpriteRenderer = null;
function Start () {
myRenderer = GetComponent.<SpriteRenderer>( );
setColor( );
}
function setColor( ) {
if(life == 3) setRed( );
else if(life == 2) setGreen( );
else if(life == 1) setWhite( );
}
function setRed( ) {
myRenderer.color = new Color(1f, 0.1f, 0.2f, 1f); // Set to Red
}
function setGreen( ) {
myRenderer.color = new Color(0.1f, 1f, 0.1f, 1f); // Set to Red
}
function setWhite( ) {
myRenderer.color = new Color(1f, 1f, 1f, 0.8f); // Set to Red
}
function Update () {
}
var life : int = 3;
function OnCollisionEnter2D( him: Collision2D) {
if(him.gameObject.tag =="BALL") { // 注意你的球的 Tag 一定要是 BALL
doHit( );
}
}
function doHit( ) {
--life;
addScore(1+life);
setColor( );
if(life == 0) {
gameObject.SetActive(false);
}
}
function addScore(gg: int) {
Player.score += gg*10;
}
///
*** 如果有錯誤 -- 說找不到 Player 類別
很簡單, 建立一個子目錄 plugins
然後把它說找不到的 Player.cs 拖拉進去該目錄即可
然後把它說找不到的 Player.cs 拖拉進去該目錄即可
///(12)先製造三種不同的磚塊
// 腳本掛給磚塊之後, 可到檢視窗中修改 life 值,
/// .. 3, 2, 1 各表示打三次才˙消失, 兩次消失, 一次消失
/// .. 3, 2, 1 各表示打三次才˙消失, 兩次消失, 一次消失
///(13)然後, 把該三種磚塊複製很多到畫面擺放
// 可以用陳間時光的磚塊編輯器複製一大堆磚塊 ! (上課會 Demo)
///(14) 建立顯示分數 用的 UI.Text
// (14a)先建立一個 UI Text 物件來秀分數
GameObject >> UI >> Text
// (14b)把攝影機 y 軸調高 2 到 10以便上方有位置放分數
還有, 把該 UI.Text 調整好: 位置, 字大小, 錨點設定
還有, 把該 UI.Text 調整好: 位置, 字大小, 錨點設定
//(14c)顯示分數的腳本可以掛給 該 UI.Text 物件即可
// showScore.js -- by [email protected]
// 把這 腳本掛給顯示分數的 UI.Text 物件即可
#pragma strict
import System.Collections.Generic;
import UnityEngine.UI; // JS ;; C# : // using UnityEngine.UI;
@SerializeField
public var score: int;
@Header("那要把 UI.Text 物件拉給txt ")
@Header("--如果腳本不是掛給 UI.Text, ")
@SerializeField
public var txt: Text; // [SerializeField] public Text txt; // C#
// 如果不是掛給 UI.Text, 那要把 UI.Text 物件拉給上述 txt 變數
function Start( ) {
if( ! txt ) txt = GetComponent.<Text>(); // GetComponent<Text>(); // C#
} // Start(
function LateUpdate( ) { // 更新分數板 寫在 LateUpdate( ) 比較好
score = Player.score; // 請在 腳本 Player 開放 static score 欄位(變數) ..
txt.text = "Score: " + score + " 最高是 " + Player.highScore; // 還有 highScore 欄位(變數)
} // Update(
/////////////////////////
/////陳間時光 2D 打磚塊 教學
// https://youtu.be/_nIeNBSQrHM
// 或
// 搜尋 陳間時光 打磚塊 youtube
/////Unity官方2D Game Creation
// https://unity3d.com/learn/tutorials/topics/2d-game-creation
//
///// 線上去背或編輯圖片
// http://pixlr.com/editor/
*** 如果有錯誤 -- 說找不到 Player 類別
很簡單, 建立一個子目錄 plugins
然後把它說找不到的 Player.cs 拖拉進去該目錄即可
然後把它說找不到的 Player.cs 拖拉進去該目錄即可
(15)(5b)讓滑鼠也可移動球拍; 前面 (5)是用鍵盤左右箭頭按鍵
// 這腳本 LaLa.js 要掛給球拍
// 這腳本 LaLa.js 要掛給球拍
// LaLa.js -- 滑鼠 控制 球拍, by [email protected]
// from LaDrop.js -- Drag and Drop the gameObject 拖拉 遊戲物件 到任何地方
///
private var z: float = 0;
private var cursorPos : Vector3;
private var newPosition : Vector3;
private var yy = 0f;
@Header("滑鼠最高到這仍可動球拍")
public var yMaxHigh = 133; // 限制滑鼠在這以下才算
@Header("球拍最左最右")
public var minLeft = -6.33; // 以前馬英九跳票的承諾 :-)
public var maxRight = 6.33;
function Start( ) {
yy = transform.position.y;
z = transform.position.z;
Cursor.visible = true;
}
///
//OnMouseDrag
function tryMove( ) { // 滑鼠正在拖動之時要做的
cursorPos = new Vector3(Input.mousePosition.x, yy, z);
newPosition = Camera.main.ScreenToWorldPoint(cursorPos) ;
var x = newPosition.x;
if(x < minLeft) x = minLeft;
if(x > maxRight) x = maxRight;
transform.position = new Vector3(x, yy, z);
}// OnMouseDrag(
function Update( ) {
if(Input.mousePosition.y > yMaxHigh) return;
//Debug.Log("x=" + Input.mousePosition.x);
//Debug.Log("y=" + Input.mousePosition.y);
tryMove( );
}
//////// End of LaLa.js
Stitches -- Sprite sheet generator OnLine free
https://draeton.github.io/stitches/
https://draeton.github.io/stitches/
【軟體名稱】:Cyotek Spriter
Cyotek Spriter是一個免費軟體,可以把把很多張圖片合併在同一張圖檔中。
(類似 Texture Packer)
【官方網址】: http://cyotek.com/
https://www.cyotek.com/cyotek-spriter
【說 明】:
Cyotek Spriter is a free application for creating sprite sheets. Although mainly designed for creating CSS sprites, you can use it to create texture atlases for games, application toolstrips or any other purpose requiring multiple images packed into a single graphic.
五張抓圖中至少三張畫面上要有你的學號姓名:
在 Unity 中用 UI (UGUI) 的Text 在左上角顯示你的學號與姓名, 加入文字陰影特效, 字體不要太小 ! (上課會Demo)
今天幫大家複習製作遊戲開頭畫面選單與載入場景(Load Scene)時顯示進度(progress)。
請自行抓下過程中五個重要畫面夾檔繳交, 每張圖片請給個簡單標題。
必要時可下載 Unity Asset Store 內的資源。
在 Unity 中用 UI (UGUI) 的Text 在左上角顯示你的學號與姓名, 加入文字陰影特效, 字體不要太小 ! (上課會Demo)
今天幫大家複習製作遊戲開頭畫面選單與載入場景(Load Scene)時顯示進度(progress)。
請自行抓下過程中五個重要畫面夾檔繳交, 每張圖片請給個簡單標題。
必要時可下載 Unity Asset Store 內的資源。
請先開啟 Unity, 開啟你已經有的場景, 或新建空的專案匯入上次給的 haha38.unitypackage (4.1MB), 儘量跟著操作就可順利繳交作業
底下有顯示進度條需要用到的程式碼 (載入場景時顯示進度條)
Asset Store 是 Unity 的線上資源商店,提供大量的角色模型、道具、材質、紋理、地形景觀製作工具、遊戲設計工具、音效與音樂、視覺化編程工具、行為腳本、編輯擴充程式等。Unity Asset Store 擁有許多實用的資源,且資源商店的下載內容部分是免費的,即使要錢的大都也很便宜,善用Asset Store 商店的資源可以縮短遊戲的開發週期。
Unity 官方提供的範例專案可以學到許多遊戲製作的重要觀念,並且熟悉 Unity 遊戲引擎的特性,建議多多下載來練習與研究。
開啟Asset Store 視窗,左側是Unity 素材資源的名稱、評分與功能介紹,視窗右側是素材資源的分類(可點選只列出免費∕付費的熱門項目)。 若您沒時間製作遊戲場景或角色的模型,也可以到Asset Store 下載來用。
Unity 官方提供的範例專案可以學到許多遊戲製作的重要觀念,並且熟悉 Unity 遊戲引擎的特性,建議多多下載來練習與研究。
開啟Asset Store 視窗,左側是Unity 素材資源的名稱、評分與功能介紹,視窗右側是素材資源的分類(可點選只列出免費∕付費的熱門項目)。 若您沒時間製作遊戲場景或角色的模型,也可以到Asset Store 下載來用。
例如, 可以匯入官方的角色(角色控制器來測試)
Unity CG 教學網
http://www.cg.com.tw/Unity/Unity.asp
http://www.cg.com.tw/Unity/Unity.asp
unity 遊戲蠻牛
/// mmm.js -- 載入場景時 用 UI Slider 顯示進度條
/// 以下這 mmm.js 腳本可用來 載入場景時顯示進度條
#pragma strict
import UnityEngine.UI;
import UnityEngine.SceneManagement;
public var sceneName : String = "3388x";
public var progress : UI.Slider;
public var dummy = true;
public var dummySpeed = 0.5f;
public var dummyLimit = 0.8f; // 最大模擬到這
private var ao : AsyncOperation;
///
function Start () {
if(progress) progress.value = 0f;
}
function Update () {
}
public function loadNext( ) {
Debug.LogError("***** Loading...");
if(progress) progress.value = 0.1f;
realLoad( );
}
//Coroutine ...
private var g = 0.38f;
function realLoad( ) {
ao = SceneManager.LoadSceneAsync( sceneName );
ao.allowSceneActivation = false;
if(dummy) yield WaitForSeconds (1.68f); // 等 1.68 秒 之後再說
yield;
if(progress) {
progress.value = 0.38f;
if(!dummy)if( ao.progress > progress.value) progress.value = ao.progress;
} // if
// checkDummy( );
if(dummy) { // 模擬 progress
g = progress.value;
while( true ) {
g = progress.value;
g += dummySpeed * Time.deltaTime;
progress.value = g;
Debug.LogError(" g =" + g +", limit=" + dummyLimit);
if(g > 0.88f) break; // 防呆
if(g > dummyLimit) break;
yield;
} // while
yield;
} // if dummy
/////
Debug.LogError("=progress=" + progress.value +", limit=" + dummyLimit);
while( !ao.isDone) {
Debug.Log("==" + ao.progress);
if(progress)if( ao.progress > progress.value) progress.value = ao.progress;
if( ao.progress > 0.88f) {
if(progress)progress.value = 1f;
ao.allowSceneActivation = true;
/// SceneManager.LoadScene( sceneName );
break; // 離開 while
} // if
yield;
} // while
yield; //SceneManager.LoadScene( sceneName );
}
////////////////////////
///你也可以下載這簡單練習檔案 0323test.zip
| 0323test.zip |
用 Animator 控制 Animation Clip 動畫片段的播放
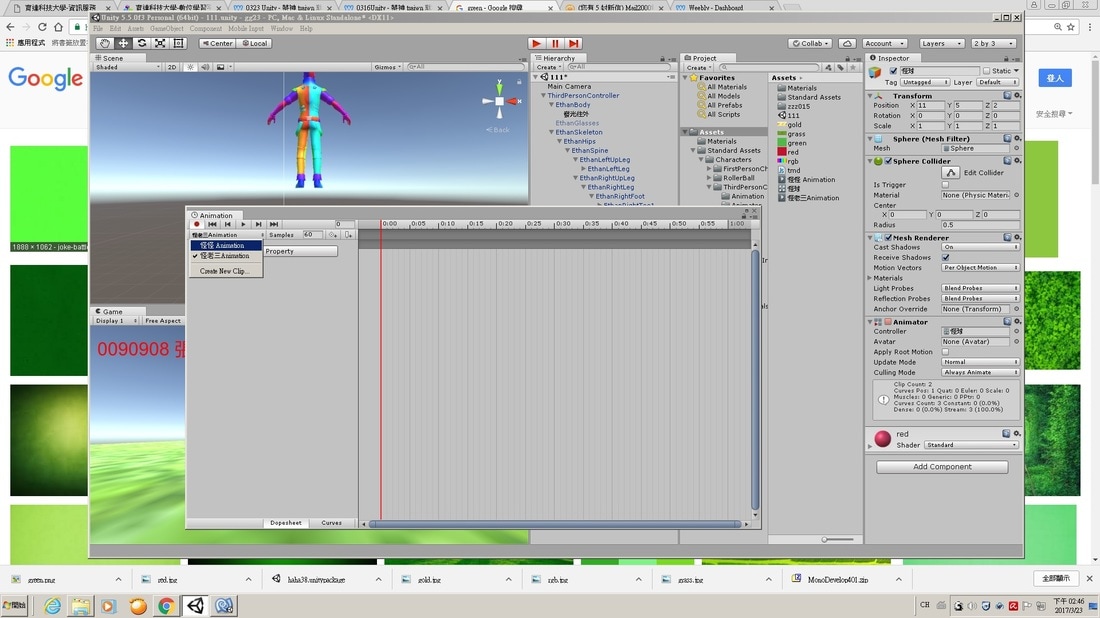
注意開啟 Windows Animation 或 Animator
之前要先點選場景中(或階層窗)的物件
之前要先點選場景中(或階層窗)的物件
開啟 Animator 窗之後注意這窗的左上角 !!
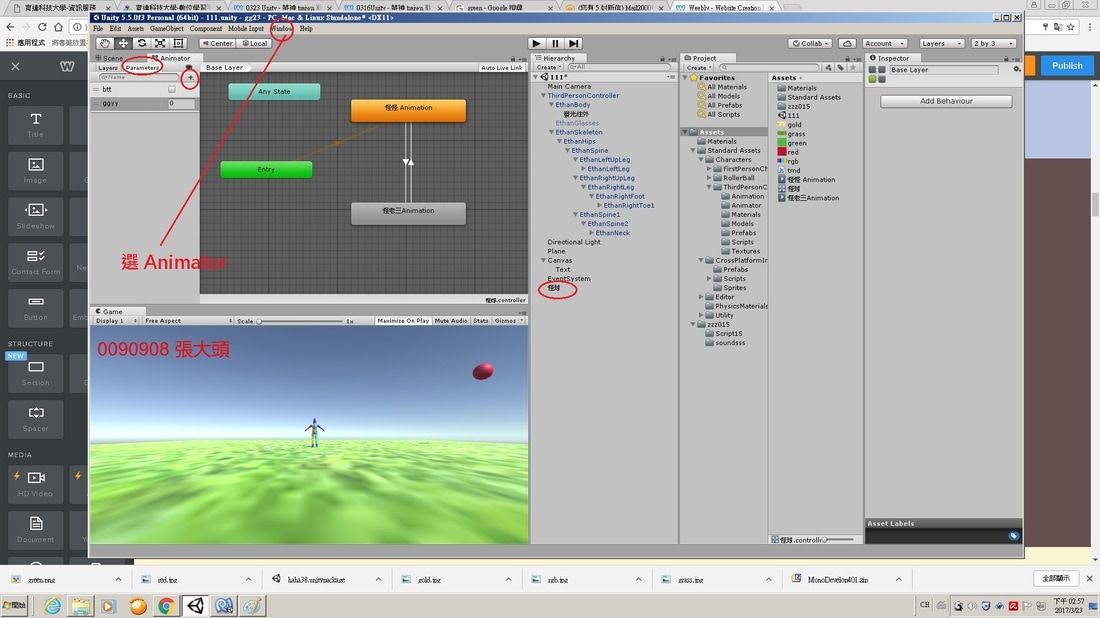
要控制狀態轉移必須先在 Animator窗左上角新增變數
接著點狀態之間的 轉移線 (按滑鼠右鍵 Make Transition生出)
然後再到右邊檢視窗設定轉移條件
接著點狀態之間的 轉移線 (按滑鼠右鍵 Make Transition生出)
然後再到右邊檢視窗設定轉移條件

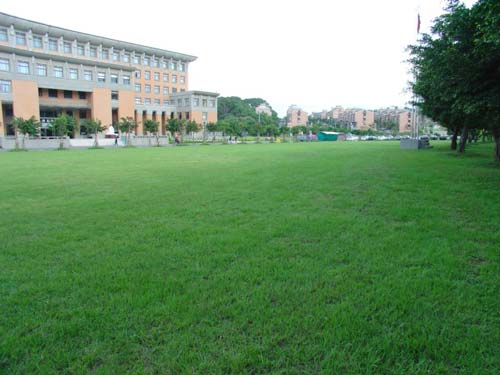
畫一張(或拍照片再處理一下)或找一張封面來用
GameObject >> UI >> Image 加入圖片, 切換到 2D 方便調整位置, 讓圖片充滿整個畫面
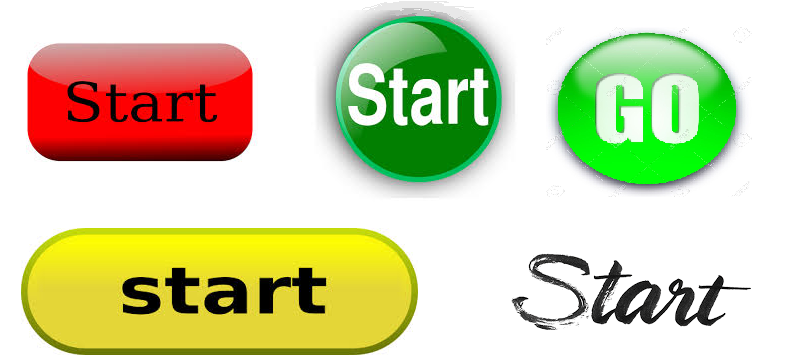
GameObject >> UI >> Button 加入按鈕, 畫一個按鈕來用
(或網路找一個免費的, 但小心智慧財產權問題)
(或網路找一個免費的, 但小心智慧財產權問題)
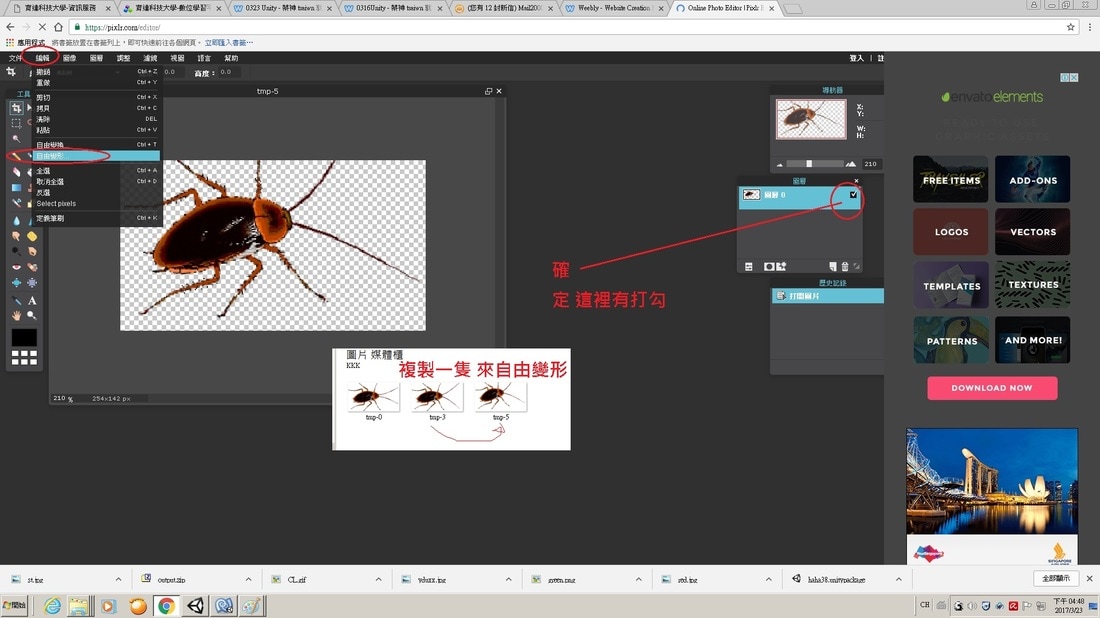
必要時可以用 PixLR.com 線上影像處理(類似 PhotoShop 功能, 至少比小畫家強大)
http://pixLr.com/editor
http://pixLr.com/editor
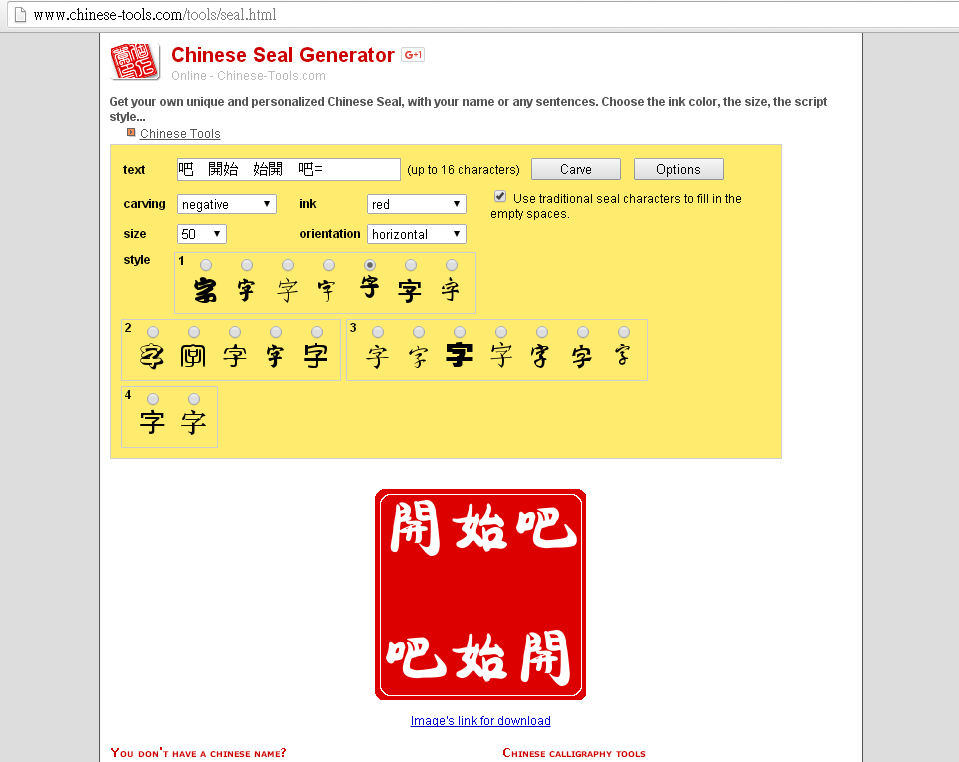
印章產生器有時也有用 http://www.chinese-tools.com/tools/seal.html
㊞㊒☺☻☺☆★❈✽✼❀☐☑✓✔√☐☒✗✕■□◆◇▲▼△▽●○☹☺
『』〖〗[]《》=≈≡≠=≤≥<>≮≯≦≧『』″「」"◄►⇦⇧⇨⇩➪⇑⇐ ⇓⇒↑←↓→℃℉☉☠
☚☛☜☞©®♂♀♥♡♠♣ ♨☀☂㊐㊊㊎㊍㊌㊋㊏㊣㊧㊨㊕㊝♛♫♬⚘♆卍卐◎◐◑☀☼
www.chinese-tools.com/tools/seal.html
㊞㊒☺☻☺☆★❈✽✼❀☐☑✓✔√☐☒✗✕■□◆◇▲▼△▽●○☹☺
『』〖〗[]《》=≈≡≠=≤≥<>≮≯≦≧『』″「」"◄►⇦⇧⇨⇩➪⇑⇐ ⇓⇒↑←↓→℃℉☉☠
☚☛☜☞©®♂♀♥♡♠♣ ♨☀☂㊐㊊㊎㊍㊌㊋㊏㊣㊧㊨㊕㊝♛♫♬⚘♆卍卐◎◐◑☀☼
www.chinese-tools.com/tools/seal.html
畫3到5張跟你遊戲有關的主角或NPC的圖片來弄成簡單動畫
或先 Gogle 找一張來任意變形
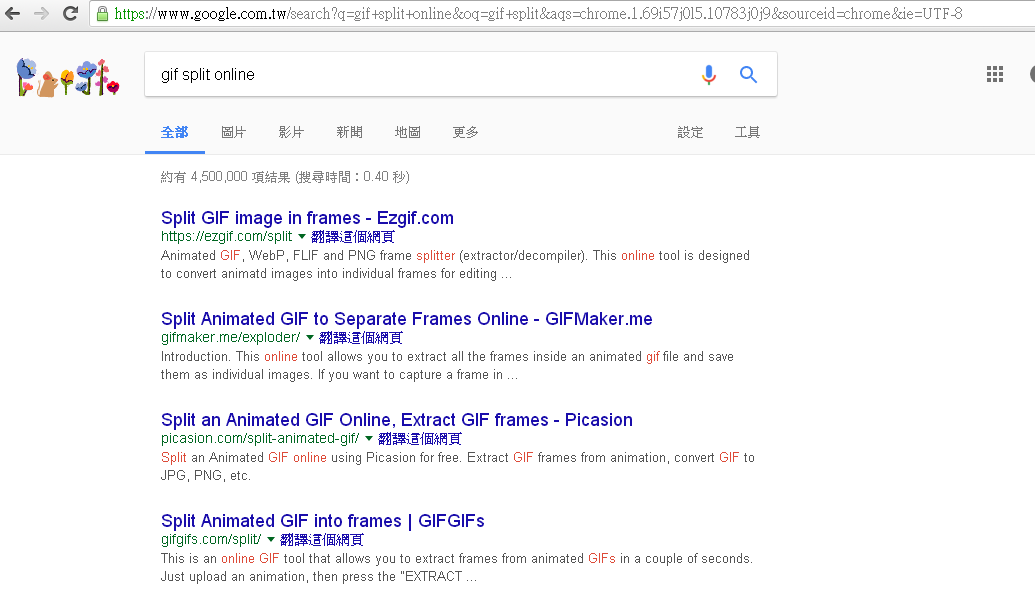
http://gifmaker.me/exploder/ You can Select a GIF file to upload there to split it:
☺☻ 還有 gif maker 和 resizeimage.net 以及 gif creator 都很好用
♥♡ http://gifmaker.me/ ☚ ☛ ☜ ☞ http://gifcreator.me/
♥♡ http://gifmaker.me/ ☚ ☛ ☜ ☞ http://gifcreator.me/
☐☑✔✕■□ http://gifmaker.me/ ↑←↓→ http://gifcreator.me/
載入圖片後記得要在圖層小窗的鎖頭小圖示點兩下解鎖否則去背無效
如果只有一張圖片也可用 pixLR.com 的 自由變形 稍微變化一些
按鈕也可以設定按下後某個物件不見,
或某個物件才出現,(例如 Loading 閃爍文字或是進度條),
甚至也可把按鈕自己變不見
按鈕也可設定按下要叫哪個遊戲物件身上的程式碼(某個函數)做事
或某個物件才出現,(例如 Loading 閃爍文字或是進度條),
甚至也可把按鈕自己變不見
按鈕也可設定按下要叫哪個遊戲物件身上的程式碼(某個函數)做事
點按鈕之後, 注意右邊的檢視窗的 OnClick 設定

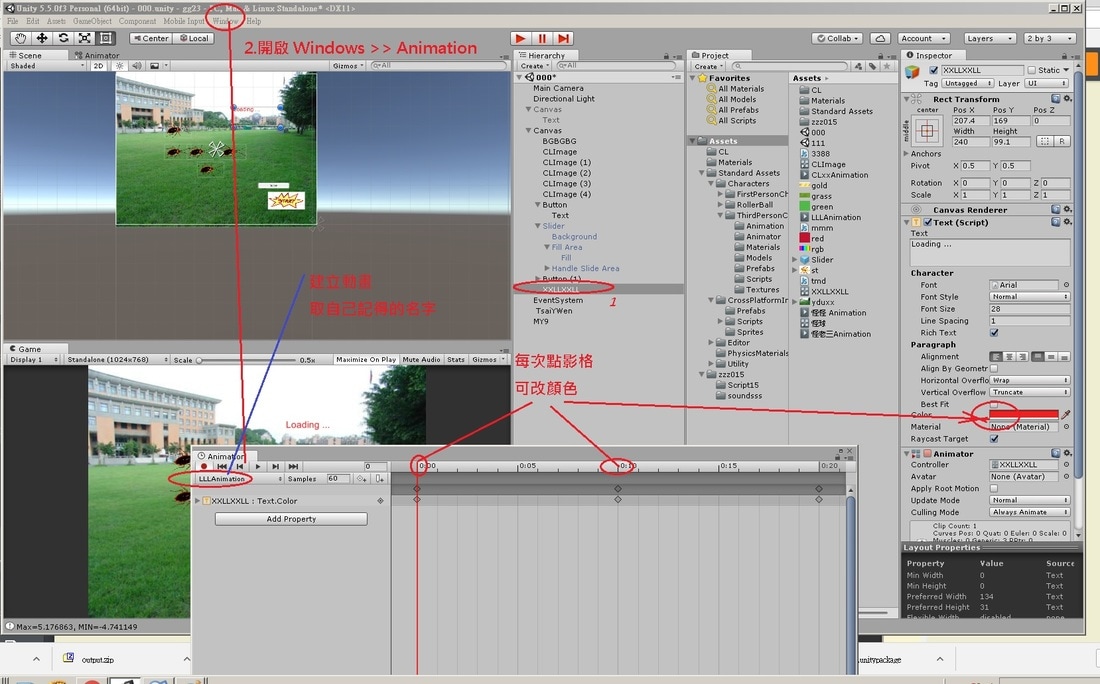
建立文字特效動畫 例如
會閃爍的 Loading...
1)新增 UI >> Text 並調整好位置
2)點亮該 Text, 開啟 Windows >> Animation
建立 Animation Clip 動畫片段之後, 在 Animation 窗中可點影格時間軸, 改字的顏色
你也可以隨時給 Text 文字增加 特效元件 Component >> UI >> Effects >> . . .
通常可加入文字邊框或陰影
且這些特效也可在 Anoimation 動畫編輯 中點不同影格改變邊框大小以及陰影狀況 !___
且這些特效也可在 Anoimation 動畫編輯 中點不同影格改變邊框大小以及陰影狀況 !___
单击此处进行编辑。
以前的做法可能像這樣用程式碼控制 ...
//////ChangeAlpha.cs
// using UnityEngine.UI;
public class ChangeAlpha : MonoBehaviour {
public Color colorGY = Color.red;
private float gg = 2.8f;
private float yy = 0f;
void Start( ) {
}
void Update ( ) {
yy += Time.deltaTime;
if(yy < gg) return;
colorGY.a = Mathf.PingPong(Time.time, 1.0f);
gameObject.GetComponent<UnityEngine.UI.Text>().color = colorGY;
gg = Random.Range(0.125f, 0.385f);
yy = 0;
}
//////
} // ChangeAlpha(
要建立 Loading 的進度(progress)條可以用 GameObject >> UI >> Slider
可以把它設定成不可以被玩家互動
可以把它設定成不可以被玩家互動
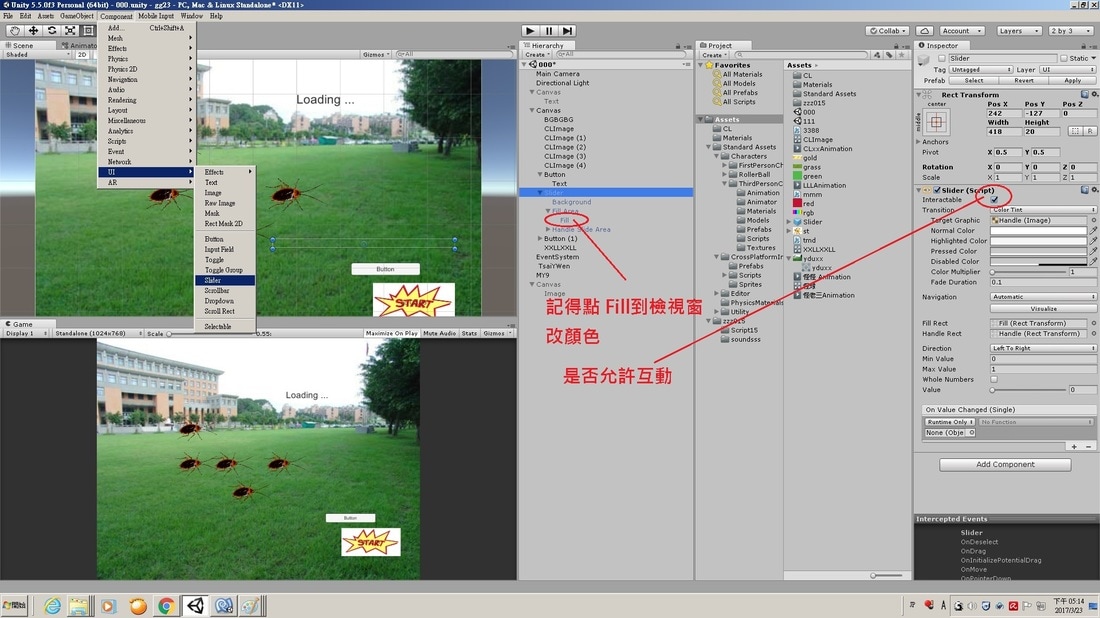
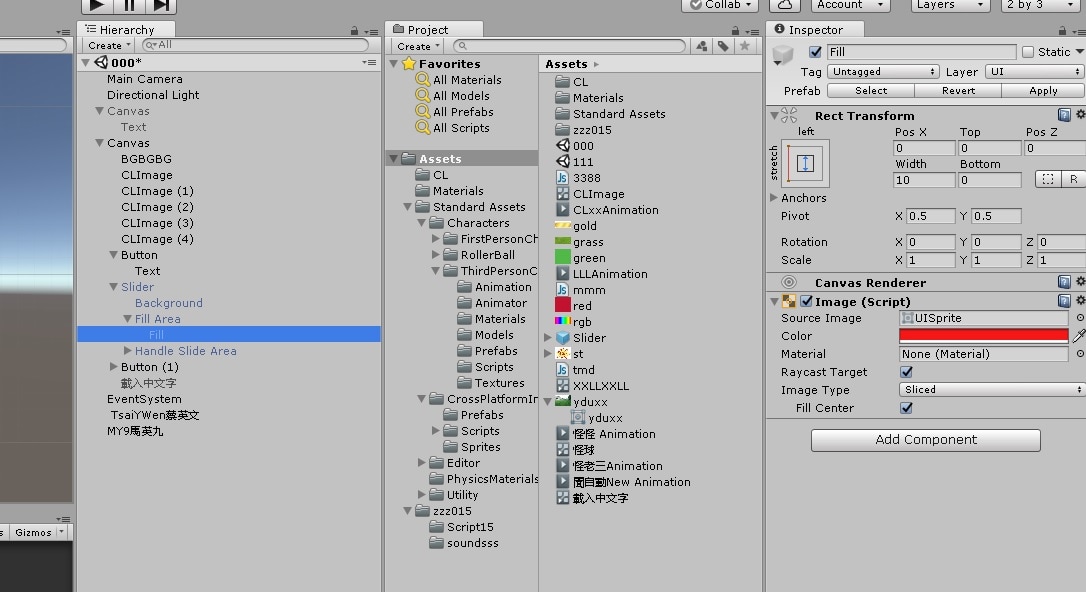
注意 Slider 的 Fill 要改顏色喔
雖然 mmm.js 可以掛給任何物件, 但是習慣上建議另外建立一個專門掌控這程式碼的物件
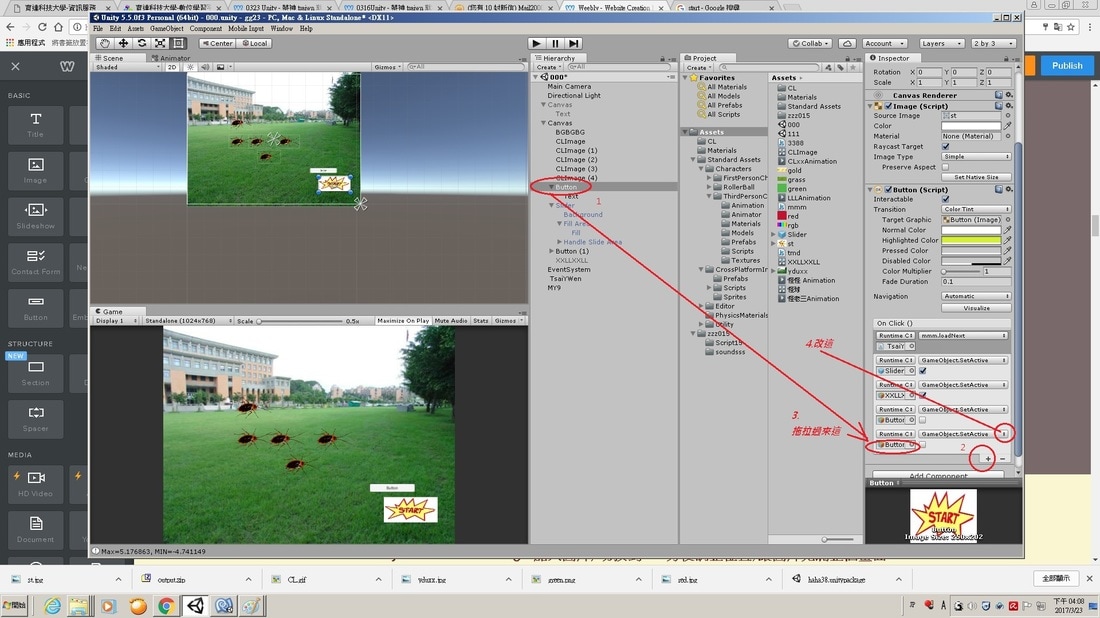
(4)接著要利用 Button 按鈕的 OnClick 事件控制蔡英文執行 mmm.js 內的 loadNext( )
如何使用 mmm.js 腳本控制切換場景 並在切換過程中 顯示進度條 ?
(1)建立空物件 (GameObject >> Create Empty), 例如:
TsaiYWen蔡英文
(2)然後把 mmm.js 拉給 蔡英文
(3)接著注意右邊檢視窗
腳本有故意露出五個變數:
Scene Name --- 要切換到哪個場景 (你可以現在改掉, 不必改程式碼)
Progress 代表進度的 Slider (記得要把你顯示進度條的 Slider 拉過來這)
Dummy 打勾表示模擬, 不打勾就真的載入(會很快!)
Dummy Speed 模擬速度(預設 0.5, 越小越慢)
Dummy Limit 模擬到哪個點(最大 1, 預設 0.8)
代表 Loading 的進度條 Slider 物件應該一開始看不見,
等按下 [開始按鈕] 才出現 !
點按鈕, 到檢視窗中按 + 增加一個 OnClick 事件控制選項,
把 Slider 物件拖拉過來控制, 點這控制項右邊小小上下箭頭圖示設定,
使其 OnClick 後會做 GameObject 內的 SetActive 為 true (打勾)
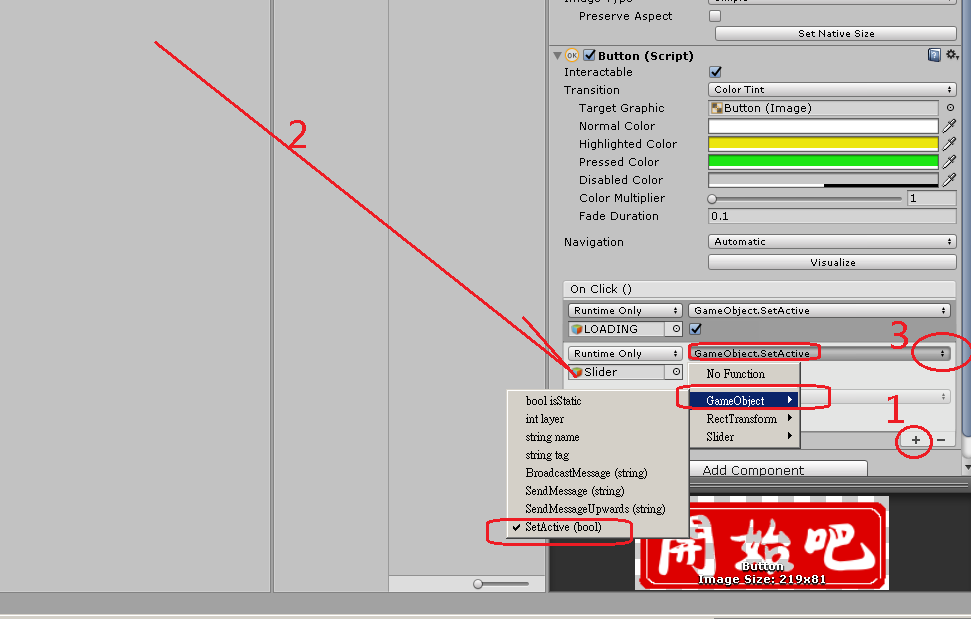
點按鈕之後注意右邊檢視窗內 OnClick 的設定
腳本 mmm.js 可以用 loadNext( ) 切換到另一個場景例如 3388x (但可在檢視窗改)
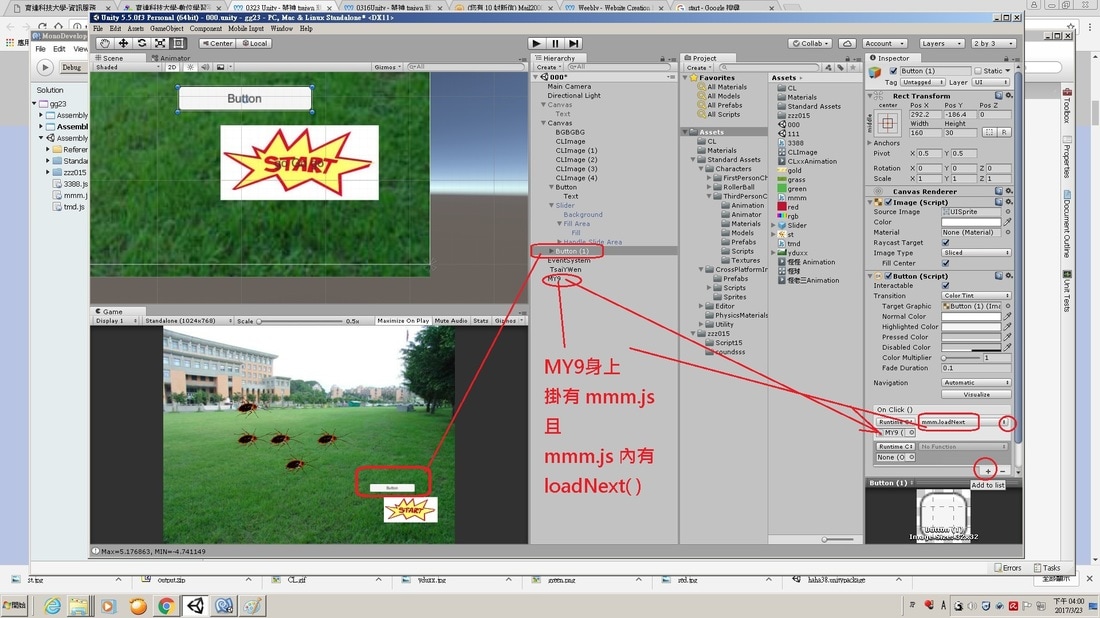
同樣的腳本可以掛給不同的物件(空物件即可) 以便按下不同按鈕可以切換不同的場景
同樣的腳本可以掛給不同的物件(空物件即可) 以便按下不同按鈕可以切換不同的場景
可以同時控制很多物件做事情
以下兩個都是空物件, 都掛有 mmm.js
TsaiYWen蔡英文
MY9馬英九
TsaiYWen蔡英文
MY9馬英九
還有還有 ....
有些物件一開始要藏起來,
等按下按鈕才讓它出現 (SetActive 為 true)
另有些物件則是相反..
就是原來 Active, 等按下就設成 GameObject >> SetActive 是 False__
等按下按鈕才讓它出現 (SetActive 為 true)
另有些物件則是相反..
就是原來 Active, 等按下就設成 GameObject >> SetActive 是 False__
.
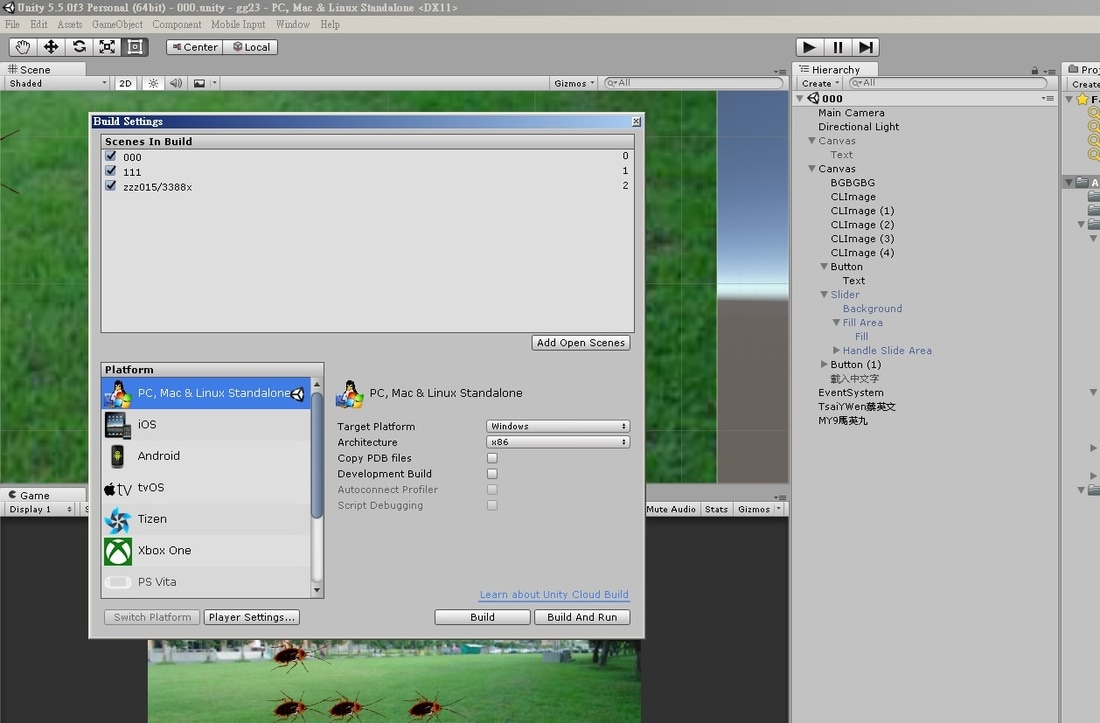
最後別忘了把場景拉入 Build Setting (File >> Build Setting...)
// bonbon.js
#pragma strict
function Start () {
}
function Update () {
}
public var aiai : AudioClip;
// 記得把 聲音 拉給這 aiai 變數
function OnTriggerEnter(thatcc: Collider) {
AudioSource.PlayClipAtPoint(aiai, thatcc.transform.position);
}
#pragma strict
function Start () {
}
function Update () {
}
public var aiai : AudioClip;
// 記得把 聲音 拉給這 aiai 變數
function OnTriggerEnter(thatcc: Collider) {
AudioSource.PlayClipAtPoint(aiai, thatcc.transform.position);
}
////// JavaScript 檔案名稱不重要, 碰到就發出聲音, 要有碰撞器, 要勾選 Trigger 觸發
////// C# 版本 BonBon.cs, 碰到就發出聲音, 要有碰撞器, 要勾選 Trigger 觸發
///// BonBon.cs --- C# --- CSharp
using System.Collections;
using System.Collections.Generic;
using UnityEngine;
public class BonBon : MonoBehaviour {
// Use this for initialization
void Start () {
}
// Update is called once per frame
void Update () {
}
public AudioClip aiai;
// 記得把 聲音 拉給這 aiai 變數
void OnTriggerEnter(Collider thatcc) {
AudioSource.PlayClipAtPoint(aiai, thatcc.transform.position);
}
}
////// 讓你的 3D 遊戲物件可以用滑鼠拖拉
// LaDrop.js -- 拖拉物件, by [email protected]
// Drag and Drop the gameObject 拖拉 遊戲物件 到任何地方
///
private var z: float;
private var offset: Vector3;
private var cursorPos : Vector3;
private var newPosition : Vector3;
///
function OnMouseDown( ) { // 滑鼠被壓下要做的
var screenPoint = Camera.main.WorldToScreenPoint(transform.position);
z = screenPoint.z;
cursorPos = new Vector3(Input.mousePosition.x, Input.mousePosition.y, z);
offset = transform.position - Camera.main.ScreenToWorldPoint(cursorPos);
Cursor.visible = false; // Hide 隱藏 Cursor 滑鼠游標
} // OnMouseDown(
function OnMouseDrag( ) { // 滑鼠正在拖動之時要做的
cursorPos = new Vector3(Input.mousePosition.x, Input.mousePosition.y, z);
newPosition = Camera.main.ScreenToWorldPoint(cursorPos) + offset;
transform.position = newPosition;
}// OnMouseDrag(
function OnMouseUp( ){ // 滑鼠放掉之時要做的, 阿就顯示 Cursor 滑鼠游標而已!
Cursor.visible = true; // show 顯示 Cursor 滑鼠游標
} // OnMouseUp(
//////// End of LaDrop.js
////// 讓你的遊戲物件可以上下移動
//////////////// 物件上下移動
/// objUpDown.js
#pragma strict
private var hold:boolean=false;
public var speed = 2.58f;
private var dir:int=-1;
private var MAX=1.98f;
private var MIN= -10.25f;
public var distanceFromCamera = 10.0f;
function Start () {
var tmppos: Vector3 = Camera.main.ScreenToWorldPoint (
new Vector3 (Screen.width/3, Screen.height, distanceFromCamera));
MAX = tmppos.y;
tmppos = Camera.main.ScreenToWorldPoint (
new Vector3 (Screen.width/3, Screen.height*1/8, distanceFromCamera));
MIN = tmppos.y;
Debug.Log("Max=" + MAX +", MIN=" + MIN);
}
function Update () {
if(Input.GetKeyDown(KeyCode.P))hold=!hold;
if(hold)return;
transform.position.y += speed*dir*Time.deltaTime;
if(dir==1)
{
if( transform.position.y > MAX)dir=-1;
} else { // is -1
if( transform.position.y < MIN)
{
dir=1;
transform.position.y = MIN;
} // inner if {}
}// if .. else ..
} // Update(
////// 讓你的遊戲物件可以左右移動
////// 物件左右移動
#pragma strict
//objRightLeft.js -- by [email protected]
private var dir : int = -1; // 1 = right, -1 = Left
public var speedUp = 3.58f;
public var distanceFromCamera = 10.0f;
private var leftPos = 0f;
private var rightPos = 0f ;
private var yPosition = 1.58;
var minSmall = 0f;
var maxLarge = 0f;
private var width = 5.0f;
/////
function Start( ) {
var tmppos: Vector3 = Camera.main.ScreenToWorldPoint (
new Vector3 (Screen.width/5, Screen.height, distanceFromCamera));
yPosition = tmppos.y;
leftPos = tmppos.x;
tmppos = Camera.main.ScreenToWorldPoint (
new Vector3 (Screen.width/2 +133, Screen.height, distanceFromCamera));
rightPos = tmppos.x;
//////
transform.position.x = (leftPos + rightPos)/2;;
transform.position.y = yPosition;
mySetup( );
}
function mySetup( ) {
width = rightPos - leftPos;
if(width < 0 ) width = - width; // 左右顛倒
minSmall = leftPos;
maxLarge = rightPos;
// 預防左右顛倒 (因攝影機角度!)
if(rightPos < minSmall) minSmall = rightPos;
if(leftPos > maxLarge) maxLarge = leftPos;
}
function Update () {
transform.position.x += dir * 0.1* Time.deltaTime * width * speedUp;
if( transform.position.x < minSmall) dir = 1; // 左右顛倒
if( transform.position.x > maxLarge) dir = -1; // 左右顛倒
}
//////// End of objRightLeft.js
// 以下腳本 按 y 可發射特效
/// tmd.js --- 特效可先拉入給 parSys ,
/// ... ... 如沒拉入, 先找身上的, 再沒則找場景上的 "呼死"
#pragma strict
// 按 y 發射特效
function Start () {
if( ! parSys) parSys =
gameObject.GetComponentInChildren(ParticleSystem); // 3.5 or later
if( !parSys ) parSys =
GameObject.Find("呼死").GetComponent.<ParticleSystem>();
if(parSys) parSys.enableEmission = false; // deprecated
if(parSys) parSys.emission.enabled = false;
}
function Update () {
if(Input.GetKeyDown(KeyCode.Y)) haha( );
}
public var parSys : ParticleSystem; // for ver. 3.5 or later versions
function haha( ) {
if( ! parSys ) return;
//parSys.enableEmission = true; // deprecated
parSys.emission.enabled = true;
parSys.Play( );
}
/// tmd.js --- 按 y 可發射特效
// 計算遊戲物件 與 Camera 的距離 dist
// JavaScript
var tmp3 :Vector3 = transform.position - camera.transform.position;
var dist :float = Vector3.Dot(tmp3, camera.transform.forward);
//The advantage is that this gives you the distance inward from the plane of the "screen",
//.. and it is also a bit more efficient in a frame update.
// C#
Vector3 tmp3 = transform.position - camera.transform.position;
float dist = Vector3.Dot(tmp3, camera.transform.forward);
/////////////////////////////////////////////

|
|
|
//////////
這是練習成果專案
壓縮檔 5566.zip (8.6MB) |
| 5566.zip |
|
yduSmall.jpg (8KB)☛ |

|
▼ yduBig.png (4.8MB) 1929 x 1333

//簡單控制動畫播放器 (Animator)
///// ggyy.js -- 注意 Animator 內要有個 Bool 變數 tt 以便控制動畫轉移
#pragma strict
var gg: Animator; // 可以不必開放這, 因我們在 Start( ) 內會自己找出身上的 Animator
function Start ( ) {
if( !gg ) gg = gameObject.GetComponent.<Animator>( ); // 註解掉這看看會怎樣
}
function Update () {
if(Input.GetKeyDown(KeyCode.Y) ) gg.SetBool("tt", true);
if(Input.GetKeyDown(KeyCode.L) ) gg.SetBool("tt", false);
}
|
▼yduBig2.png (2.9MB) 1600 x 1106
|
▼yduBig3.png (1.9MB) 1280 x 720
|

|

|
Facebook SDK for Unity
https://developers.facebook.com/docs/unity/
https://developers.facebook.com/docs/unity/
[Unity] Facebook SDK 範例使用教學
2015年11月4日
Bug ???
