(因為新版的不支援 JavaScript 語法 :-( )
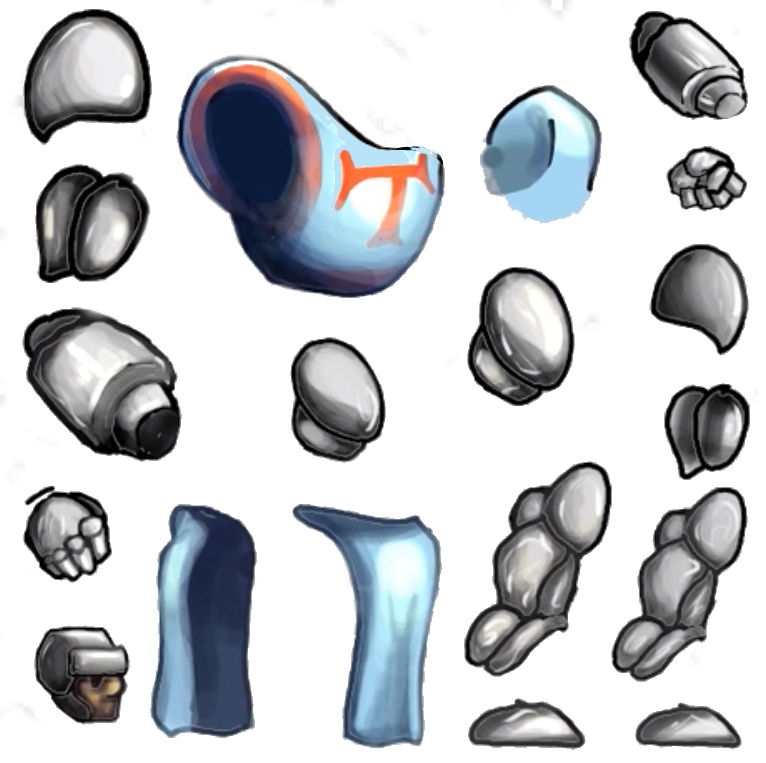
做遊戲很簡單, 只要會到網路上偷資料 !
拿釣竿! 不要只拿魚 !

問題1 a如果怪物死掉後 且角色的鏡頭離開怪物身上時 b就怪物重生
https://youtu.be/9JVa1brCmQo?t=31s
https://youtu.be/9JVa1brCmQo?t=31s
Unity Spawn again Tutorial camera movement
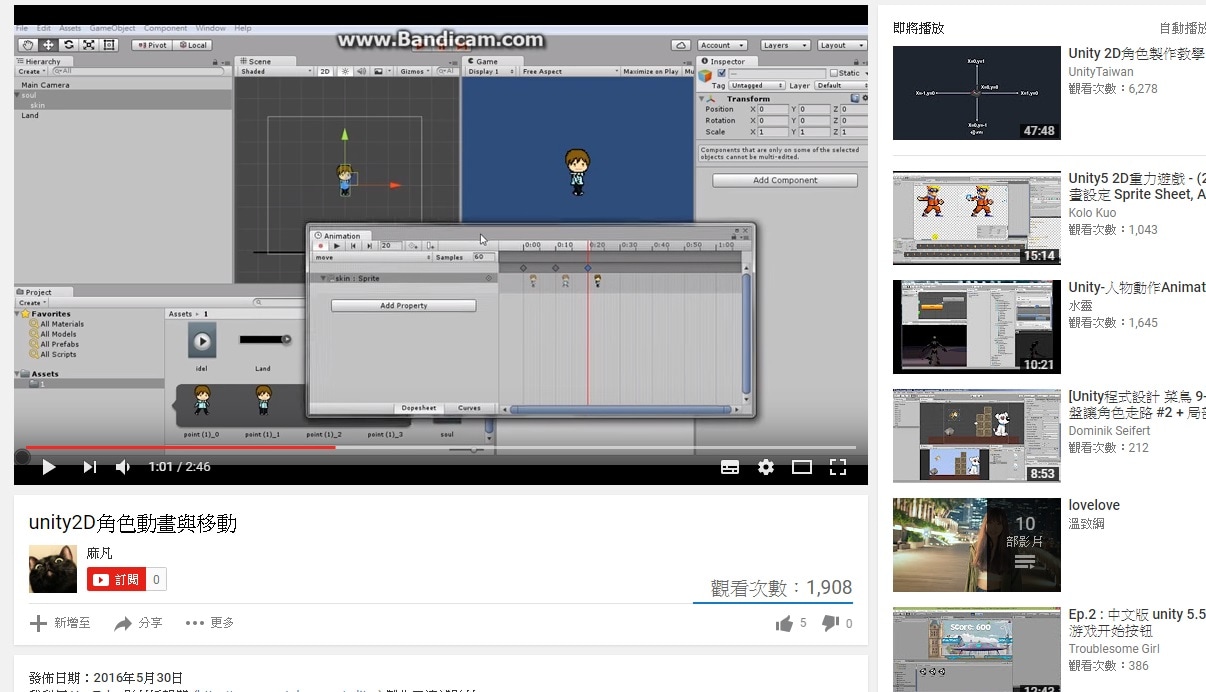
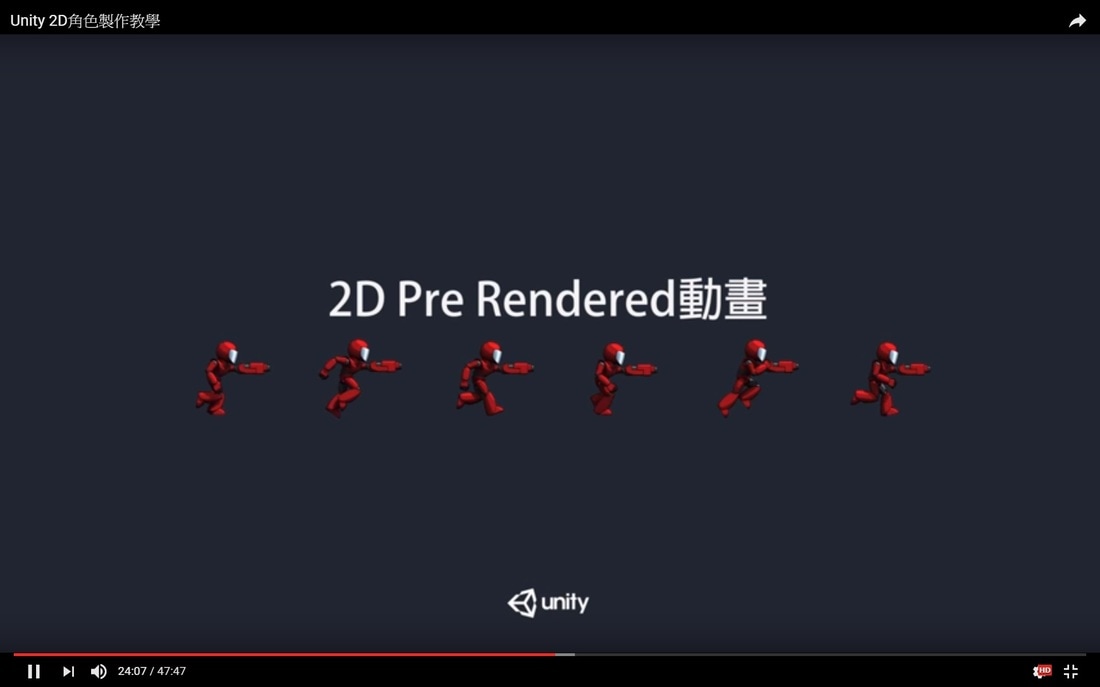
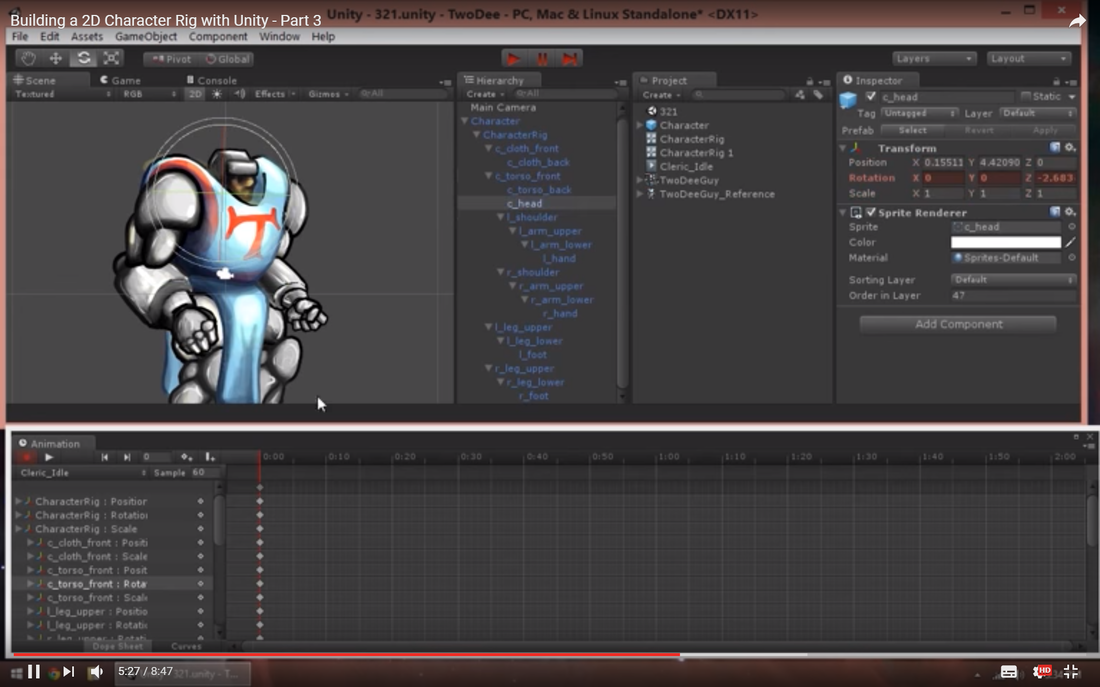
簡單 2D 動畫製作教學
unity2D角色動畫與移動 (3分鐘)
///如何記住最高分數(或進度...)
//Player.cs
///===========
// 分數 score,  故意用 static 以便可以寫 Player.score
[Header("紀錄分數, 用 static, 方便寫 Playr.score")]
public int diff2Save = 123;  //差多少就要強迫寫入 Flash/Disk ?
public static int score = 0;
public static int highScore = 0; //最高分數
private static int oldHighScore = 0; //最高分數

 void Awake ( ) {
    oldHighScore = highScore = PlayerPrefs.GetInt("PlayerHighScore");   // 讀取紀錄
 }
 public static void checkHighScore(int score) {
   if (score > highScore) {
      highScore = score;
      PlayerPrefs.SetInt("PlayerHighScore", score);   // 更新紀錄
   } // if( score >
   if(highScore - oldHighScore > diff2Save){
      oldHighScore = highScore;
      PlayerPrefs.Save( );  // 注意這可能會讓遊戲 Lag 一下
   }
 } // checkHighScore(
///

//////
//在任何產生新分數 score 的地方

Player.checkHighScore(score);
////// C# 腳本 GGG.cs -- 控制角色左右移動與跳躍
/// 以下是之前控制角色左右移動與按空白做跳躍, with Bug Fixed
/// 修正後的 GGG.cs -- 原先有兩個 Bugs
/// <summary>
/// GGG.cs ((( 正確版本 !!! )))
/// </summary>
using System.Collections;
using System.Collections.Generic;
using UnityEngine;
public class GGG : MonoBehaviour {
Animator a;
[Header("以下 Fff 是往上跳的力氣")]
public float fff = 8888f;
Rigidbody2D bdy;
[Header("以下 SpeedX 是左右速度的倍數")]
public float speedX = 33f;
// Use this for initialization
void Start () {
bdy = GetComponent<Rigidbody2D>();
a = GetComponent<Animator>();
}
// Update is called once per frame
void Update () {
if( Input.GetButtonUp("Jump") ) bdy.AddForce( new Vector2( 0, fff) ); //原先有錯
float move = Input.GetAxis("Horizontal");
move = move * speedX;
bdy.velocity = new Vector2(move, bdy.velocity.y); // 原先有錯
if(move < 0) move = - move;
a.SetFloat("sp", move);
}
}
把跳起來之後的垂直速度 (y ) 印出來看看, 以便決定如何設定 跳起來動畫的 Blend Tree
/// testVSP.cs
/// <summary>
/// /////////////////////
/// </summary>
using System.Collections;
using System.Collections.Generic;
using UnityEngine;
public class testVSP : MonoBehaviour {
Rigidbody2D rb;
float gg = 0f; // 記住上次印過的 vsp 垂直速度
// Use this for initialization
void Start () {
rb = GetComponent<Rigidbody2D>();
}
// Update is called once per frame
void Update () {
float yy = rb.velocity.y;
if( yy != gg ) { // yy 與印過的 gg 不同
gg = yy;
Debug.LogError("vsp = " + yy + " ;; " + Time.time);
} // if( yy != gg
} //Update (
}
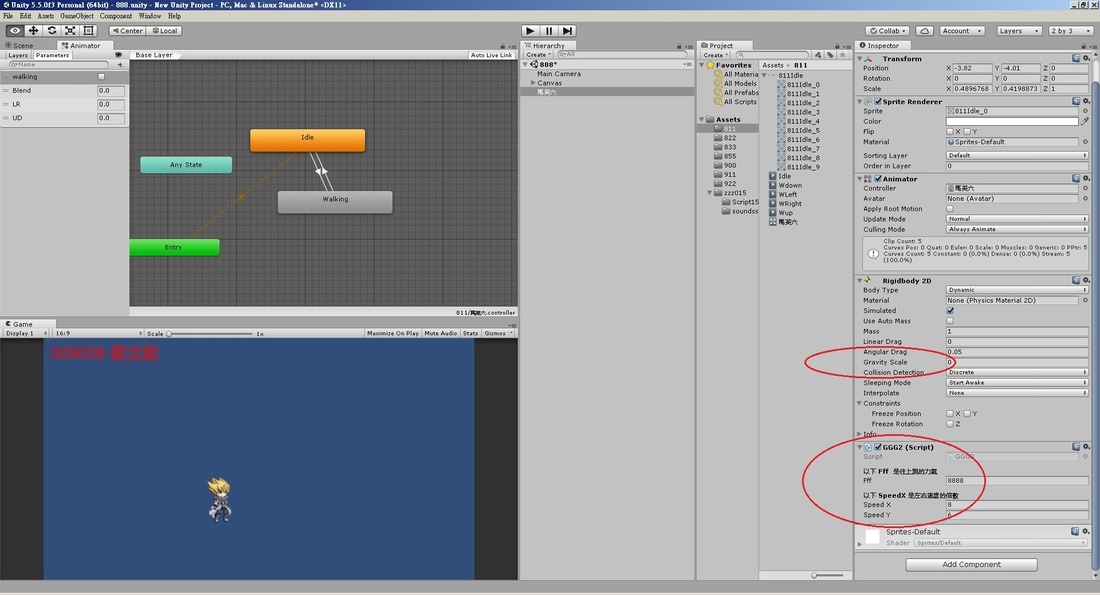
2D Blending
以下這圖用來做 Idle 嘟嘟好 :-)

以下這張用來做上下左右走路
跑步囉...

(1)切割各個 Sprite Sheet 為一張張的圖片
(2)製作 Animation Clip
(3)開啟 Animator 窗把要整合的各個 Walking 狀態刪除
(4)按滑鼠右鍵選建立空的 State 狀態, 改名 Walking
(5)在 Walking 狀態按滑鼠右鍵選建立內部Blend Tree
(5)在 Walking 狀態按滑鼠右鍵選建立內部Blend Tree
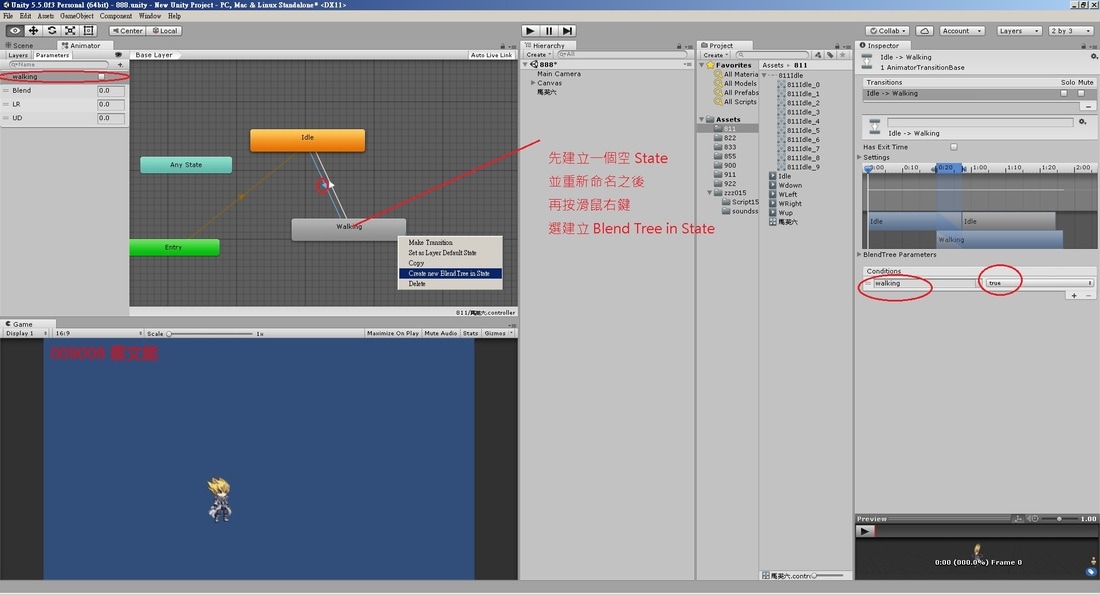
注意下圖中左上角的參數
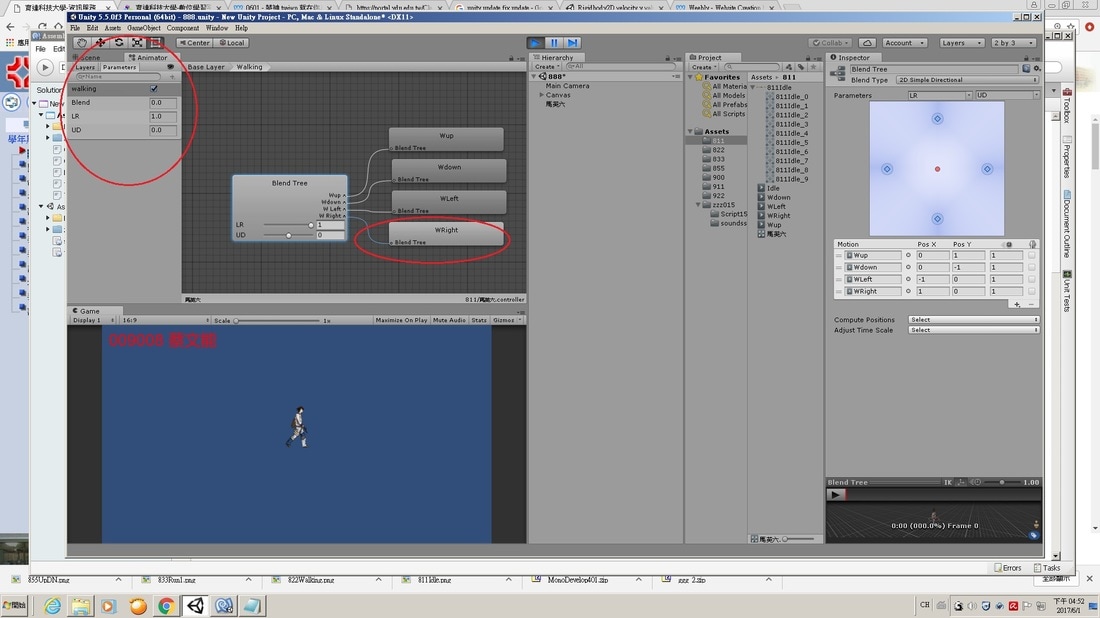
///對照以下 GGG2.cs 內 LRUD( ) 函數內對 Animator 的設定
/// <summary>
/// GGG2.cs ((( 正確版本 !!! )))
/// </summary>
using System.Collections;
using System.Collections.Generic;
using UnityEngine;
public class GGG2 : MonoBehaviour {
Animator a;
[Header("以下 Fff 是往上跳的力氣")]
public float fff = 8888f;
Rigidbody2D bdy;
[Header("以下 SpeedX 是左右速度的倍數")]
public float speedX = 8f;
public float speedY = 6f;
// Use this for initialization
void Start () {
bdy = GetComponent<Rigidbody2D>();
a = GetComponent<Animator>();
}
void clearState( ) {
a.SetFloat("LR", 0f);
a.SetFloat("UD", 0f);
a.SetBool("walking", false);
}
void checkLRUD( ) {
if (Input.GetKey (KeyCode.LeftArrow)) { //左
clearState( );
a.SetBool("walking", true);
a.SetFloat("LR", -1f);
}
if (Input.GetKey (KeyCode.RightArrow)) { // 右
clearState( );
a.SetBool("walking", true);
a.SetFloat("LR", 1f);
}
if (Input.GetKey (KeyCode.UpArrow)) { //上
clearState( );
a.SetBool("walking", true);
a.SetFloat("UD", 1f);
}
if (Input.GetKey (KeyCode.DownArrow)) { //下
clearState( );
a.SetBool("walking", true);
a.SetFloat("UD", -1f);
}
} ///
///
// Update is called once per frame
void Update () {
if (Input.GetButton("Jump")) { // 現在空白鍵表示停止移動 !
a.SetBool("walking", false); // ggyy
bdy.velocity = new Vector2(0, 0); // 速度歸 0
}
checkLRUD (); // 根據上下左右設定 Animator
/// 以下控制角色移動
float move = Input.GetAxis("Horizontal");
move = move * speedX;
float moveY = Input.GetAxis("Vertical");
moveY = moveY * speedY;
bdy.velocity = new Vector2(move, moveY); // 左右上下
if (move != 0 || moveY != 0) {
a.SetBool("walking", true); // ggyy
}
//////
}
}
// 可以抓以下第三次半成品測試
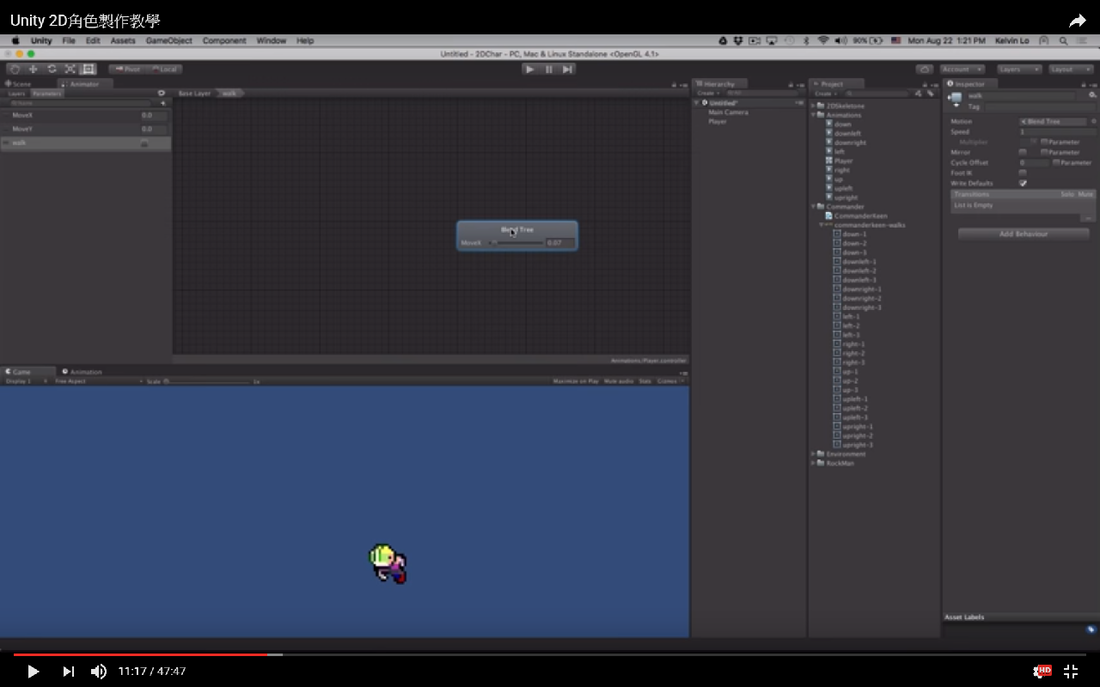
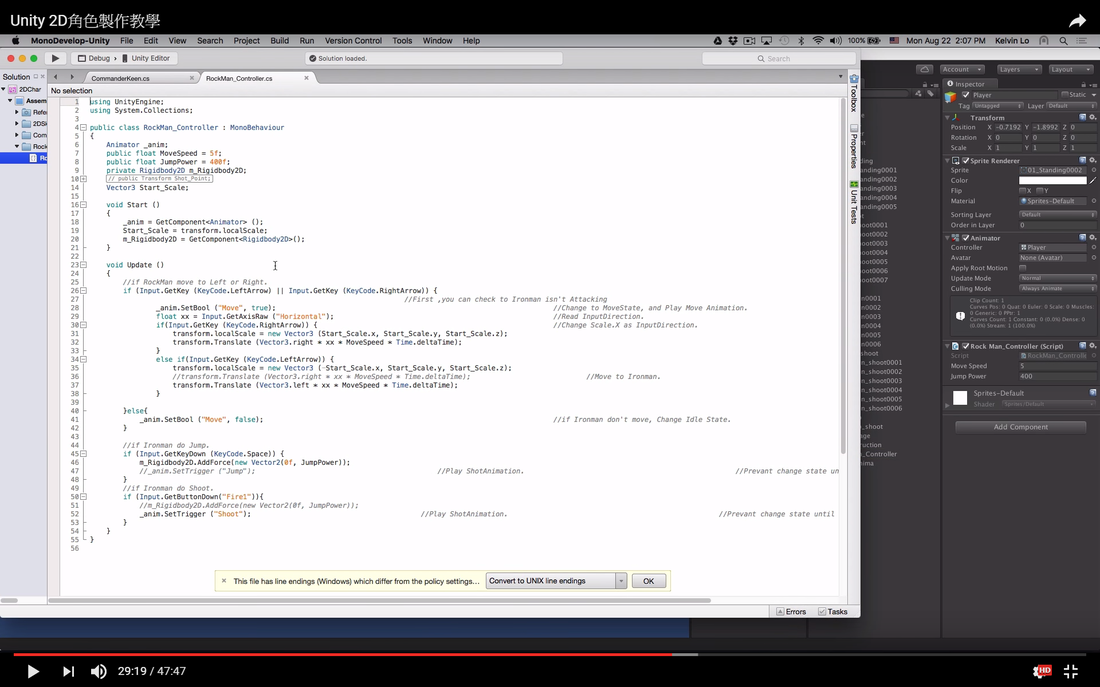
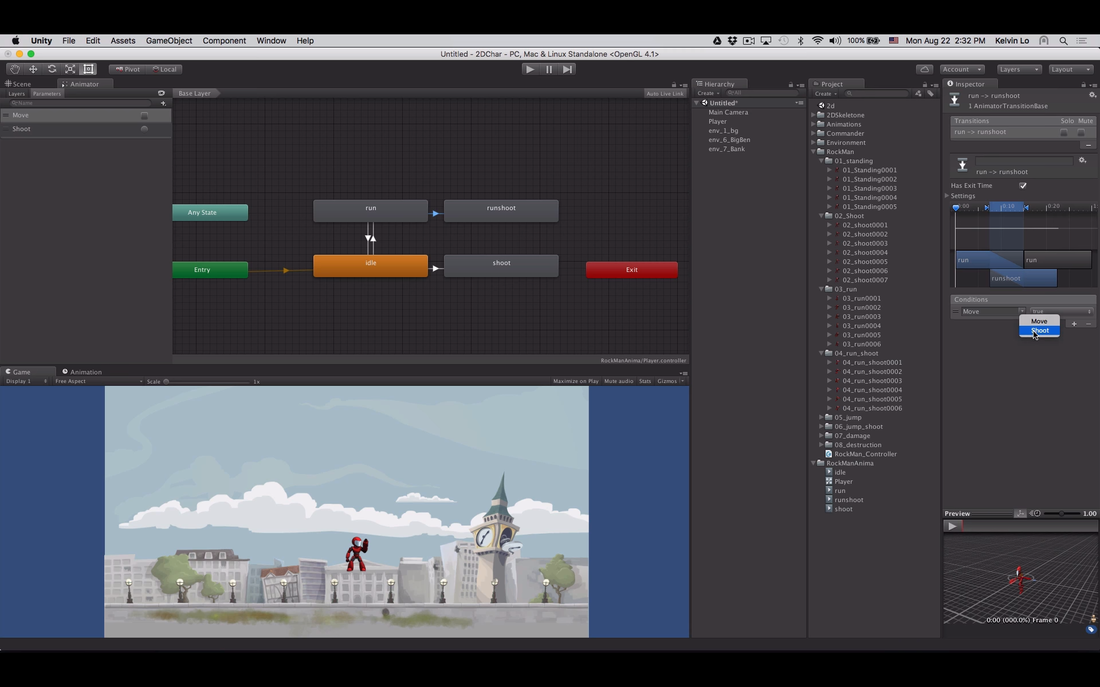
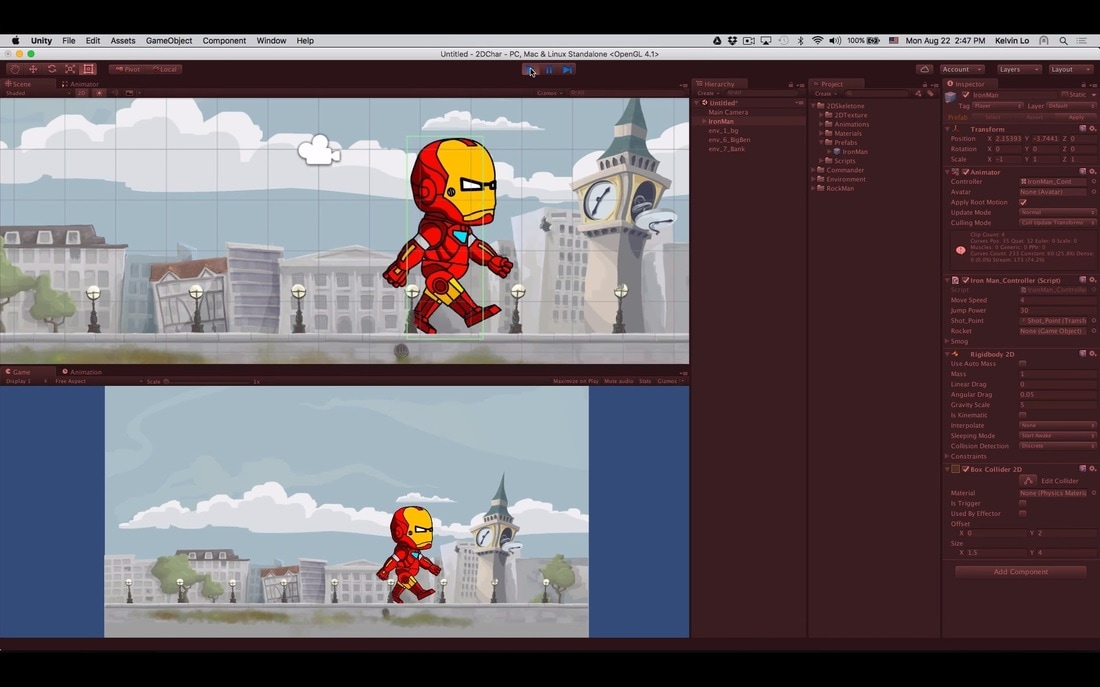
Unity 2D角色製作教學 (48 min.)
這是Unity Evangelist Kelvin Lo在巡迴Workshop的一個Unity 2D Characters專案,透過這個教學可以了解如何在Unity裡面製作2D角色
可以下載作者附送的可匯入檔案 Unity2D Characters.unitypackage (3.16MB)
| unity2d_characters.unitypackage |
影片內重要片段
切割(Slice) Sprite Sheet 為多張圖片
https://youtu.be/NL3nYvZI7KQ?t=0m55s
https://youtu.be/NL3nYvZI7KQ?t=0m55s
上面的方法也會產生沒用的 Animator Controller 動畫控制器 (狀態轉移機 State Machine);
所以我建議不要這樣做動畫,
至少第二個動畫開始不要像這樣直接拉數張圖片進去!
要先點把第一個動畫的 Animation 窗叫出(按下 Control_6 即可),
然後在該 Animation 窗左上角點按新增新的 Animation Clip
所以我建議不要這樣做動畫,
至少第二個動畫開始不要像這樣直接拉數張圖片進去!
要先點把第一個動畫的 Animation 窗叫出(按下 Control_6 即可),
然後在該 Animation 窗左上角點按新增新的 Animation Clip
第一個控制角色移動的簡單腳本
//寫一個腳本讀取鍵盤上下左右鍵, 移動腳色,
/// .. 並設定 Animator
//先假設 Animator 內有三個參數(參考以下)

//在 C# 腳本內
//注意這不是完整程式碼喔 !
[Header("必要時請調整以下移動速度")]
public float walkSpeed = 5f;  // 每秒鐘移動 5 單位
private Animator anim;
/// 自己程式內控制移動則可以沒有 Rigidbody2D 或 Rigidbody
private Vector3 prevMoveDir;  // 前一個移動方位
private moveDir;  // 現在的移動方位
void Start( ) {
   anim = GetComponent( );
} //Start(
///
void Update( ) {
   moveDir = Vector3.zero;   // new Vector3(0, 0, 0);
   if(Input.GetKey( KeyCode.LeftArrow )) moveDir.x = -1f;
   else if(Input.GetKey( KeyCode.RightArrow )) moveDir.x = 1f;
   else if(Input.GetKey( KeyCode.UpArrow )) moveDir.y = 1f;
   else if(Input.GetKey( KeyCode.DownArrow )) moveDir.y = -1f;
   transform.position += moveDir * walkSpeed * Time.deltaTime;
   setAnim( );
} // Update(
/////
void setAnim( ) {
   if(moveDir.sqrMagnitude > 0) {
      anim.SetBool("walk", true);
      prevMoveDir = moveDir;  // 記住目前方向
   } else {
      anim.SetBool("walk", false);
      moveDir = prevMoveDir;
   } // if .. else..
   anim.SetFloat("MoveX", moveDir.x);
   anim.SetFloat("MoveY", moveDir.y);
} //setAnim(
////////
// 腳本記得要掛給角色
/// 在Animator 內(左上角)加三個參數:兩個 Float 和一個 Bool
float MoveX; // 注意大小寫
float MoveY; // 注意大小寫
bool walk; // 注意大小寫
https://youtu.be/NL3nYvZI7KQ?t=10m31s

Blend Trees - Unity Official Tutorials (8 min.)
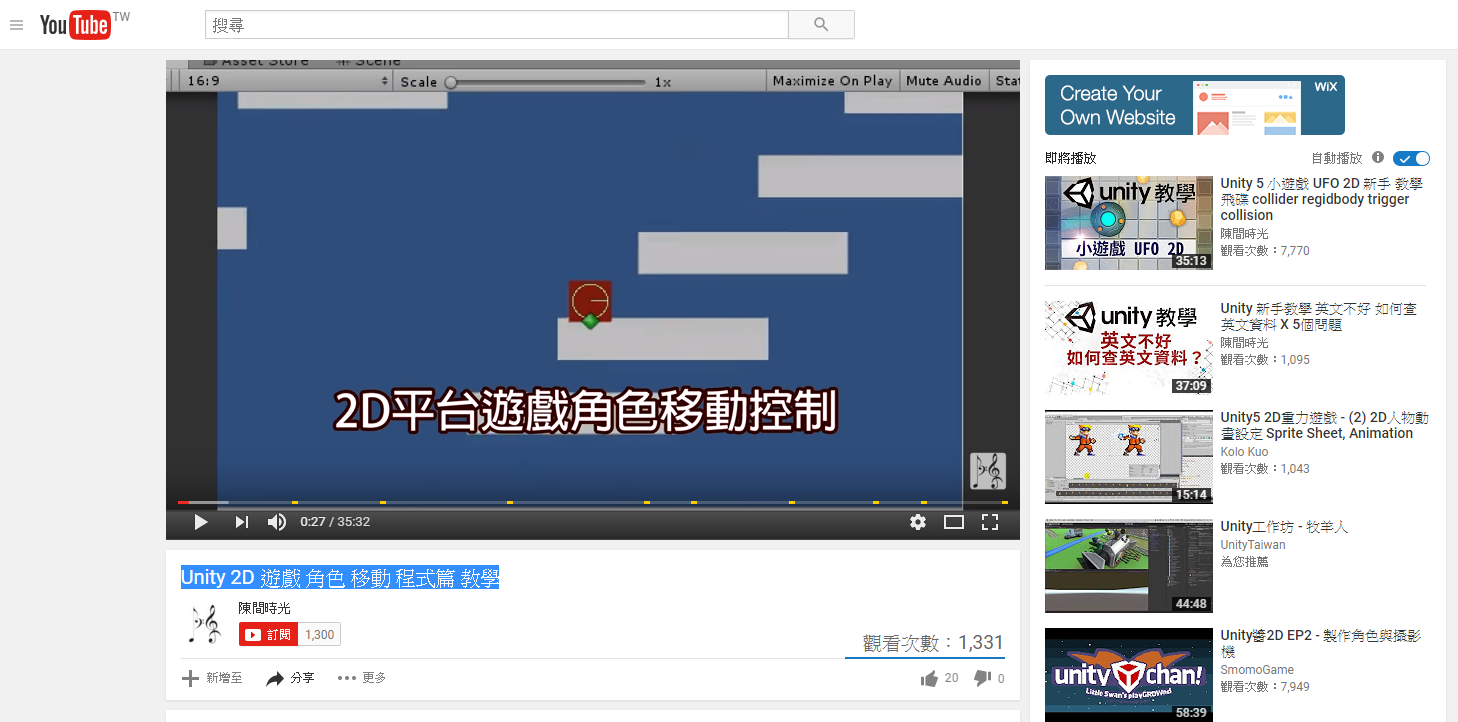
Unity 2D 遊戲 角色 移動 程式篇 教學
https://youtu.be/9mHZNYqz3ZE
https://youtu.be/9mHZNYqz3ZE
用淺顯易懂的方式解說如何實作2D角色移動的控制 包含走路與跳躍
而且能用 Physics2D.Linecast 判定是否在地板上,是的話才能跳躍
(也就是不能在空中連跳)
而且能用 Physics2D.Linecast 判定是否在地板上,是的話才能跳躍
(也就是不能在空中連跳)
之前(4/25)教過的是利用檢查是否重疊的:
Physics2D.OverlapCircle( ) 這函數檢查是否在地上 (is grounded)
用到的程式碼 在 陳間時光 部落格
http://www.morningfungame.com/2017/05/unity-2d-character-movement-control-csharp.html
http://www.morningfungame.com/2017/05/unity-2d-character-movement-control-csharp.html
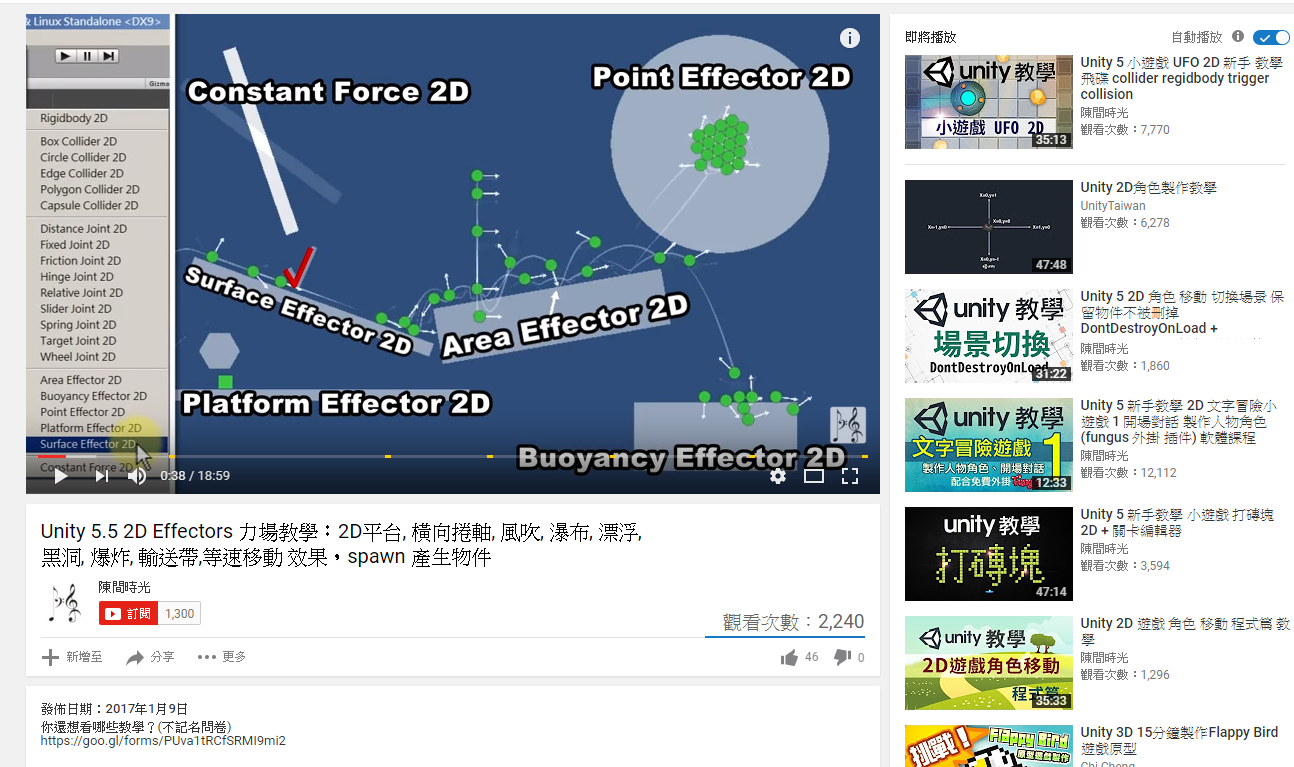
| unity_5_5_effectors_.zip |
2D Character Controllers 官方教學
======
Animation clip 與 Animator 控制器練習 (3D)
發呆(Idle) ==> 走路 (左轉前進右轉) : 使用 1D Blend Tree
教學影片( 12 分鐘)
https://youtu.be/y65W5eShkpM
https://youtu.be/y65W5eShkpM
// 用到的腳本:
///blending.cs
using UnityEngine;
using System.Collections;
public class blending : MonoBehaviour {
private Animator anim;
private float h;
private float v;
// Use this for initialization
void Start () {
anim = GetComponent<Animator> ();
}
// Update is called once per frame
void Update () {
h = Input.GetAxis ("Horizontal");
v = Input.GetAxis ("Vertical");
anim.SetFloat ("Walk", v);
anim.SetFloat ("Turn", h);
}
}
/// 注意 Animator 那邊要弄兩個Float 參數(Parameter) :
Walk 和 Turn
官方網站教學
Animate Anything with Mecanim

//DoorActivator.cs
using UnityEngine;
using System.Collections;
public class DoorActivator : MonoBehaviour {
public Animator[] lights;
private Animator animator;
void Awake () {
animator = GetComponent <Animator>();
}
void OnTriggerEnter (Collider other) {
if (other.gameObject.tag == "Player") {
animator.SetBool ("Open", true);
foreach (var light in lights) {
light.SetTrigger ("Activate");
}
}
}
void OnTriggerExit (Collider other) {
if (other.gameObject.tag == "Player") {
animator.SetBool ("Open", false);
}
}
}
阿葉的Unity3D密技「Mecanim Animator Controller 由淺入深」 (90分鐘)
素材包以及程式碼參考(GoogleDrive) :
https://drive.google.com/drive/folders/0B0Jy9V02wfUcS2JwUjIyRVNyQTg?usp=sharing
但是他的英文不太好, 不要學他的發音 :-)
例如 false(假的) 他會念成 廢喔死
其實應該念 Four 匙
例如 false(假的) 他會念成 廢喔死
其實應該念 Four 匙
他講到那句關於"保險" ..
if( !Anim.IsInTransition(0) ) {
// 正確的意思是 如果動畫 不是 正在轉移狀態
}
if( !Anim.IsInTransition(0) ) {
// 正確的意思是 如果動畫 不是 正在轉移狀態
}
/// 宣告
Rigidbody2D myRigidbody2D;
[Header("左右移動的力量倍數 SpeedX")]
public float speedX = 33f;
[Header("跳的力氣 JumpForce")]
public float jumpForce = 5566f;
Rigidbody2D myRigidbody2D;
[Header("左右移動的力量倍數 SpeedX")]
public float speedX = 33f;
[Header("跳的力氣 JumpForce")]
public float jumpForce = 5566f;
///要讓玩家用鍵盤控制角色移動通常有三種方法
/// 第一種控制方法 : 直接取得左右箭頭按下的值 (-1 到 1 之間)
myRigidbody2D = new Vector2(
Input.GetAxis("Horizontal") * speedX,
myRigidbody2D.velocity.y);;;
///第二種方法是對左右按鍵分別給予剛體一個力氣 (force)
//查看是否按了右箭頭
if (Input.GetKey(KeyCode.RightArrow))
myRigidbody2D.AddForce(Vector2.right * speedX);
///// Vector2.right 就是 new Vector(1,0)
//看看是否按了左箭頭
if (Input.GetKey(KeyCode.LeftArrow))
myRigidbody2D.AddForce(Vector2.left * speedX);
if (Input.GetKey(KeyCode.RightArrow))
myRigidbody2D.AddForce(Vector2.right * speedX);
///// Vector2.right 就是 new Vector(1,0)
//看看是否按了左箭頭
if (Input.GetKey(KeyCode.LeftArrow))
myRigidbody2D.AddForce(Vector2.left * speedX);
///第三種方法是直接計算與改變遊戲物件的位置
(這方法因為與物理引擎無關, 遊戲物件可以沒有帶剛體)
(這方法因為與物理引擎無關, 遊戲物件可以沒有帶剛體)
///// 讓玩家控制角色跳躍 (Jump)
if (Input.GetButtonDown("Jump"))
myRigidbody2D.AddForce(new Vector2(0, jumpForce));
///請注意 jumpForce 要事先宣告(前面暫給 5566f)
myRigidbody2D.AddForce(new Vector2(0, jumpForce));
///請注意 jumpForce 要事先宣告(前面暫給 5566f)
==GameManager== (from 陳間時光)
/// 如何只保留一份遊戲管理物件(最開始的那份)
/// 如何只保留一份遊戲管理物件(最開始的那份)
/// GameManager.cs
using System.Collections;
using System.Collections.Generic;
using UnityEngine;
using UnityEngine.SceneManagement;

public class GameManager : MonoBehaviour {
    //singleton
    //單例模式
    static GameManager instance;
    public int money;
    void Awake () {
        if (instance==null)
        {
            instance = this;
            DontDestroyOnLoad(this);
            name = "最初的遊戲管理物件";
            money = 0;
        }
        else if (this!=instance)
        {
            string sceneName = SceneManager.GetActiveScene().name;
            Debug.Log("刪除場景"+sceneName+"的"+name);
            Destroy(gameObject);
        }
 }

 void Update () {

 }
}
==Door==
// 撞到門, 進入另一個場景 (載入場景)
using System.Collections;
using System.Collections.Generic;
using UnityEngine;
using UnityEngine.SceneManagement;

public class Door : MonoBehaviour {

    [Header("連接到某場景")]
    public string goToTheScene;
    void OnTriggerEnter2D(Collider2D other)
    {
        if (other.CompareTag("玩家"))
        {
            SceneManager.LoadScene(goToTheScene);
        }
    }

}
==Gold==
/// 碰到金幣, 賺 10 元
using System.Collections;
using System.Collections.Generic;
using UnityEngine;

public class Gold : MonoBehaviour {

    GameManager gameManager;
    void Awake()
    {
        gameManager = FindObjectOfType<GameManager>();
    }
    void OnTriggerEnter2D(Collider2D other)
    {
        if (other.CompareTag("玩家"))
        {
            gameManager.money += 10;
            Debug.Log("金錢="+gameManager.money);
        }
    }

}
Left/Right test function
It is easy to get the angle between two vectors using Vector3.Angle,
but this only gives an absolute value for the angle.
How do you tell if one direction is to the left or to the right of the other?
but this only gives an absolute value for the angle.
How do you tell if one direction is to the left or to the right of the other?
/// C# version
//returns -1 when to the left, 1 to the right, and 0 for forward/backward
public float AngleDir(Vector3 fwd, Vector3 targetDir, Vector3 up)
{
Vector3 perp = Vector3.Cross(fwd, targetDir);
float dir = Vector3.Dot(perp, up);
if (dir > 0.0f) {
return 1.0f;
} else if (dir < 0.0f) {
return -1.0f;
} else {
return 0.0f;
}
}
//////////// another version
float AngleDir(Vector3 fwd, Vector3 targetDir, Vector3 up) {
Vector3 right = Vector3.Cross(up, fwd); // right vector
float dir = Vector3.Dot(right, targetDir);
if (dir > 0f) {
return 1f;
} else if (dir < 0f) {
return -1f;
} else {
return 0f;
}
}
///////////
///static version , javaScript
////////
//returns -1 when to the left, 1 to the right, and 0 for forward/backward
public static function AngleDir(fwd: Vector3, targetDir: Vector3, up: Vector3) : float {
var perp: Vector3 = Vector3.Cross(fwd, targetDir);
var dir: float = Vector3.Dot(perp, up);
if (dir > 0.0) {
return 1.0;
} else if (dir < 0.0) {
return -1.0;
} else {
return 0.0;
}
}
///
MoveTowards Example
There is no difference between 2D and 3D with respect to moving to the mouse position. An Orthographic camera does simplify the code a bit (2D or 3D).
要把遊戲物件移動到滑鼠點下的位置,
在 2D 和 3D 的做法並無差別;
要注意的是 2D 內的 z 軸位置也是有意義的 !
記得要把 target 的 z 軸位置改為與原先 transform 的 z 軸位 一樣,
否則你可能會發現物件走一段之後會憑空消失 !
要把遊戲物件移動到滑鼠點下的位置,
在 2D 和 3D 的做法並無差別;
要注意的是 2D 內的 z 軸位置也是有意義的 !
記得要把 target 的 z 軸位置改為與原先 transform 的 z 軸位 一樣,
否則你可能會發現物件走一段之後會憑空消失 !
Here is a bit of starter code. If you Google "Unity3d move towards mouse position," you will find other solutions.
///// 主要是須用到以下這句把滑鼠點到的螢幕位置轉為世界座標
Vector3 target = Camera.main.ScreenToWorldPoint (Input.mousePosition);
using UnityEngine;
using System.Collections;
public class GotoMouse : MonoBehaviour {
public float speed = 38.5f;
private Vector3 target;
void Start () {
target = transform.position;
}
void Update () {
checkKeyBoard( ); // 讓玩家也可用鍵盤左右箭頭按鍵
checkMouse ( ) ;
transform.position = Vector3.MoveTowards(
transform.position, target, speed * Time.deltaTime);
}
///
void checkKeyBoard( ) {
float gg = Input.GetAxisRaw("Horizontal"); // -1, 0, 1
if( gg == 0) return;
transform.position = new Vector3( transform.position .x + gg * speed * Time.deltaTime,
transform.position.y , transform.position .z );
setAnim(gg);
}
void setAnim(float gg) { // 預留要改變動畫的方向
// 1.利用改transform.localScale.x就可改變動畫的方向避免倒退魯
//2.必要時把 gg 設定到 Animator 的參數
} // setAnim(
void checkDir(float here, float there) {
float dir = 0f;
if(there > here) dir = 1f;
if(there < here) dir = -1f;
setAnim(dir);
}
void checkMouse ( ) {
if (Input.GetMouseButtonDown(0)) {
target = Camera.main.ScreenToWorldPoint(Input.mousePosition);
target.z = transform.position.z;
checkDir(transform.position.x, target .position.x);
}
} // checkMouse (
}
如果還要兼顧動畫的方向呢(避免倒退魯!)
/// 假設 Animator 裡面有參數(Parameter) Direction
public class mousepos : MonoBehaviour {
private Animator anim;
public float speed = 13.5f;
private Vector3 target;
private Vector3 MousePosition;
private Vector3 PlayerPosition;
void Start () {
anim = GetComponent<Animator>();
target = transform.position;
}
///
void Update () {
checkMouse( );
checkKeyBoard( );
transform.position = Vector3.MoveTowards (
transform.position, target,
speed * Time.deltaTime);
} // Update(
void checkMouse( ) {
float dir = 0f;
float origX = 0f;
if (Input.GetMouseButtonDown (0)) {
target = Camera.main.ScreenToWorldPoint (Input.mousePosition);
origX = transform.position.x;
Debug.Log ("target 的 z 軸 = " + target.z + ", 會被改為 " + transform.position.z);
target.z = transform.position.z;
if (target.x <= origX) { // 在左邊
dir = transform.localScale.x;
if(dir > 0) dir = -dir; // 確保負數
setDirection(dir);
} else if (target.x >= origX) { // 在右邊
dir = transform.localScale.x;
if(dir < 0) dir = -dir; // 確保正數
setDirection(dir);
} // else if .. 左邊 .. 右邊
} // if 按下滑鼠
}
void setDirection(float dir) {
transform.localScale = new Vector3 (dir,
transform.localScale.y, transform.localScale.z);
if(dir >= 0) anim.SetInteger ("Direction", 1);
else anim.SetInteger ("Direction", -1);
}
void checkKeyBoard( ) {
}
} // class
